As part of our series on Linux, we bring you another article – this time on the package manager in Linux. In our previous article we talked about what the Linux OS is and some of the differences. We also mentioned the package manager which is responsible for providing software, so in this article we will explain how a package manager works and how to install software with it.
What is a package manager?
A package manager is a collection of software tools that automate the process of installing, updating, configuring and removing applications.
Applications in Linux come in the form of a packages. A package is a file containing the desired software, along with all the dependencies of the said software. The reason packages are used is that it simplifies installing Linux software as it provides a standardized way for developer’s to provide and maintain software and for end users to install it and update it. This has made Linux far easier to use than the old days where almost everything had to be compiled by the end user, often with problems along the way.
How does the package manager work?
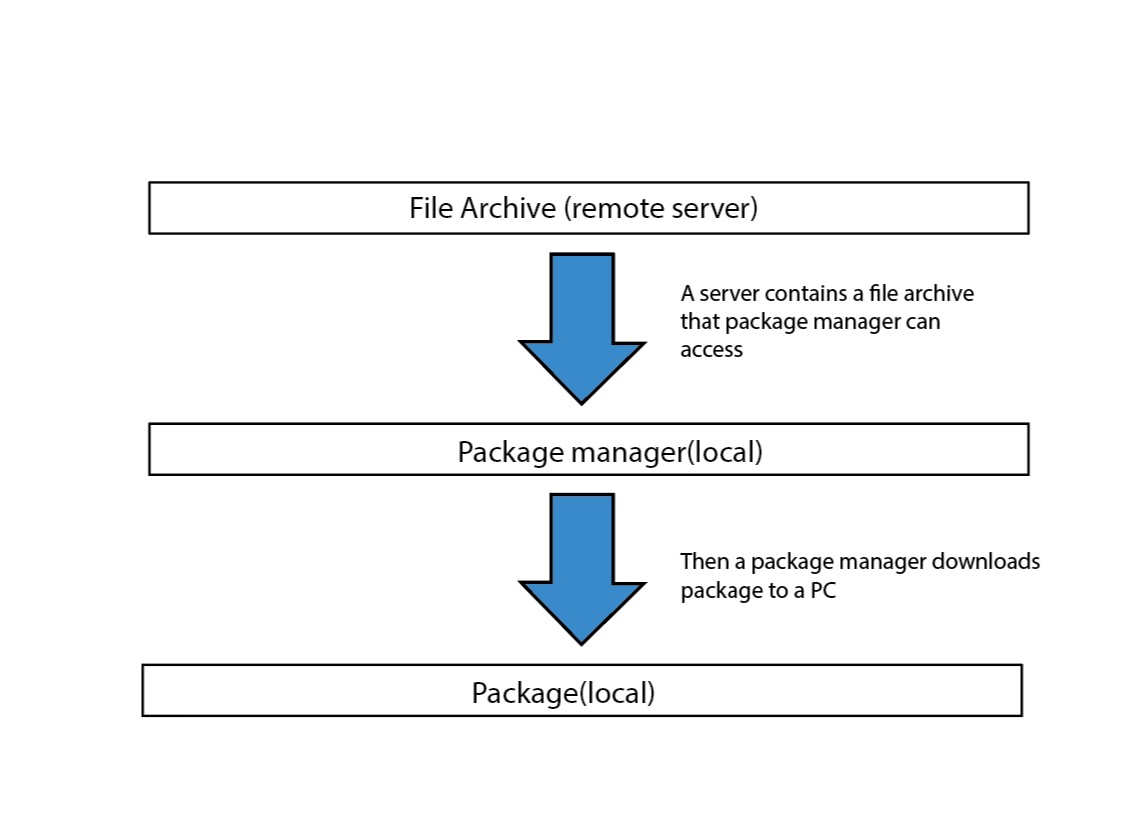
The package manager goes through a few steps to install your application. First when you request a particular package, it will look for that package in the archive files. Archives are essentially a file server full of packages, and the archive may have several versions of a package. A file archive is specific to a Linux distribution, but it is also possible for two distros to have the same archive. While each Linux distribution will therefore have some archives setup when installed, there maybe additional optional archives that you may want to add to support specific tools.
Here is a little illustration of how the structure of a package manager works:
 If the package manager finds the requested package and the versions of it, then it will compare the versions it has to the version you requested. By default if no options are given it will install the latest version and it will choose 64 bit if your OS is 64bit. If you specifically need an older version or a 32 bit version you may have to specify exactly what you want.
Once the correct version is found then the package manager will check for dependencies. These are other packages that the package needs in order to run. For example – software A may require B and C in order to run. C may require D to run. So the package manager will ask the end user if it is ok to download and install A, B, C and D. Once approval has been given then the package manager will install each package in the correct order. Once done it will clean up any leftover install files.
Popular Package Managers
There are a few package managers that have become a standard for use in Linux based OS. The most popular are apt, dnf/yum and pacman. The choice of package manager is dependent on distribution’s default package manager and while it can be changed it isn’t recommended as it can lead to instability. It is usually easier to just learn how to use the default package manager rather than fight it. Here is a list from Wikipedia that sums up the usage of different package managers:
| Action | zypper | pacman | apt | dnf (yum) | portage |
|---|---|---|---|---|---|
| install package | zypper in PKG |
pacman -S PACKAGE |
apt install PACKAGE |
yum install PACKAGE |
emerge PACKAGE |
| remove package | zypper rm -RU PKG |
pacman -R PACKAGE |
apt remove PACKAGE |
dnf remove --nodeps PACKAGE |
emerge -C PACKAGE oremerge --unmerge PACKAGE |
| remove package+orphans | zypper rm -u --force-resolution PKG |
pacman -Rs PACKAGE |
apt autoremove PACKAGE |
dnf remove PACKAGE |
emerge -c PACKAGE oremerge --depclean PACKAGE |
| update software database | zypper ref |
pacman -Sy |
apt update |
yum check-update |
emerge --sync |
| show updatable packages | zypper lu |
pacman -Qu |
apt list --upgradable |
yum check-update |
emerge -avtuDN --with-bdeps=y @world oremerge --update --pretend @world |
| delete orphans+config | zypper rm -u |
pacman -Rsn $(pacman -Qdtq) |
apt autoremove |
dnf erase PKG |
emerge --depclean |
| show orphans | zypper pa --orphaned --unneeded |
pacman -Qdt |
package-cleanup --quiet --leaves --exclude-bin |
emerge -caD oremerge --depclean --pretend |
|
| update all | zypper up |
pacman -Syu |
apt upgrade |
yum update |
emerge --update --deep --with-bdeps=y @world |
The Arch Linux Pacman/Rosetta wiki offers an bigger overview.
Installing the Software
So now let’s compare installing software with and without the package manager. If you don’t use a package manager then typically you would need to compile from the source code.
- Compiling from source
This method is one most commonly used in distros like Arch Linux, as the native support for packages is smaller than the Debian based distros like Ubuntu where there is plenty of software support.
- Get the Source Code
The source code can be downloaded as a tarball/zipped file or can be cloned from git. Usually it’s better to use the git cloning method as it allows for easier updates of the software.
You just have to type git clone https//:link-to-the-source.git and the git will clone the repository to your local PC in the current working directory.
2. Install dependencies
A source code often has dependencies – this is a shared library that the developer used to create the software. For example almost any kind of custom parser/compiler requires a flex and bison. If you can’t use a package manager then you must compile these dependencies (and their own dependencies) from their own source code first, which means starting over on this list with the dependencies.
3. Final installation
Usually everything boils down to two commands: make and make install. make compiles the code into the executable file, while make install configures the installation so the executable file becomes a command for use in the terminal.
An example of this kind of installation would be compiling the linux kernel to update your distro’s version to the latest:
sudo apt install build-essential git
git clone https://github.com/torvalds/linux.git
make
sudo make install
Now let’s look at the alternative
- Installing from the command line package manager
This is much more simple. You just pass the name of the software app that you want to the package manager and assuming it is supported then it and it’s dependencies will be installed.
An example of this – installing inksape on any Debian based OS like Ubunutu:
sudo apt install inkscape #installs inkscape - vector graphics drawing software
or for Arch Linux:
sudo pacman -S inkscape
- Installing from a GUI package manager “App Store”
Another alternative to the command line package manager is the app store on Ubuntu which allows you to use a GUI to search, install and remove any apps you want. Blame Apple for the naming.

In essence, installing software on Linux boils down to your distro and the ability to use a package manager makes your life so much easier. Usually its just the matter of typing a simple one line command and your software will install. There is no need to search for the right install file on the internet or find the right version.


