We firmly believe that pump speed in a “normal” PC loop is something that should be “set and forget”. Dial in the flow rate you are after OR set to the noise level you are comfortable with (hopefully both outcomes are achieved) and you’re done.
However the ability to control pump speed is very useful during the loop bleeding process. Varying the pump speed can assist in dislodging stubborn air bubbles or even larger air pockets, therefore we think that pump speed control is actually a very useful feature indeed.
With the VPP755 boasting both manual control with the adjustable dial and electronic control with PWM we were certainly interested to find out how it would work in the real world.
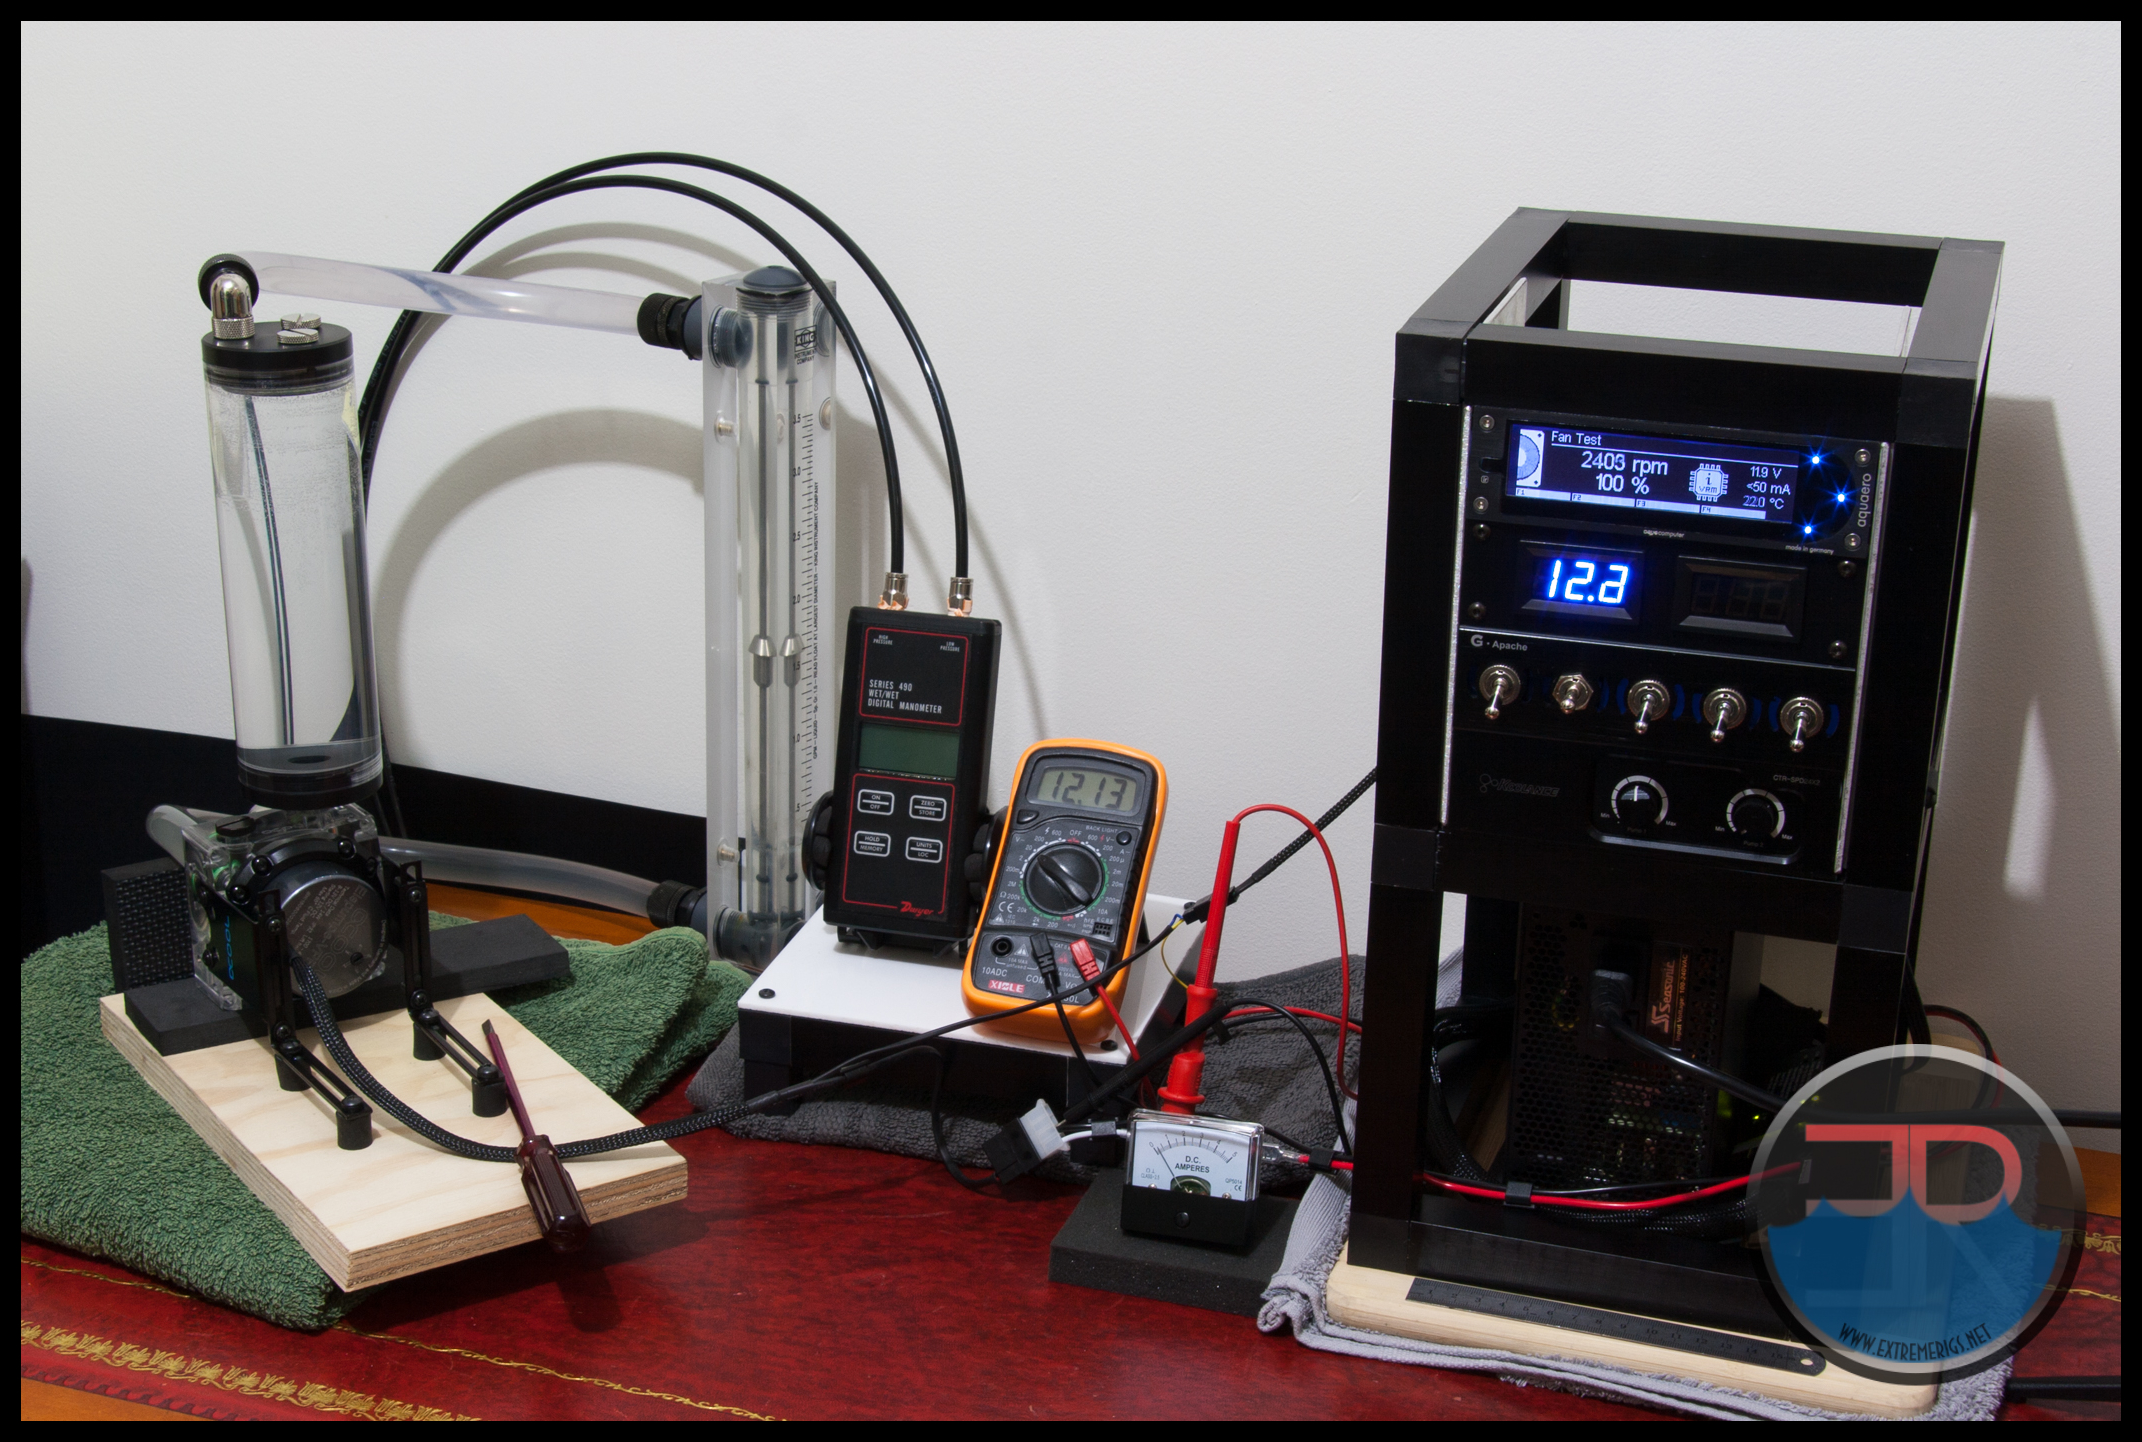
We got our first taste of the PWM controls when the VPP755 was set up on the flow/pressure test bench and from the outset we ran into what we thought at the time were control difficulties. This particular test bench utilizes an Aquaero 6 for RPM display and PWM control, and usually the pump is powered from a separate bench top PSU which has volts and amps display panels.
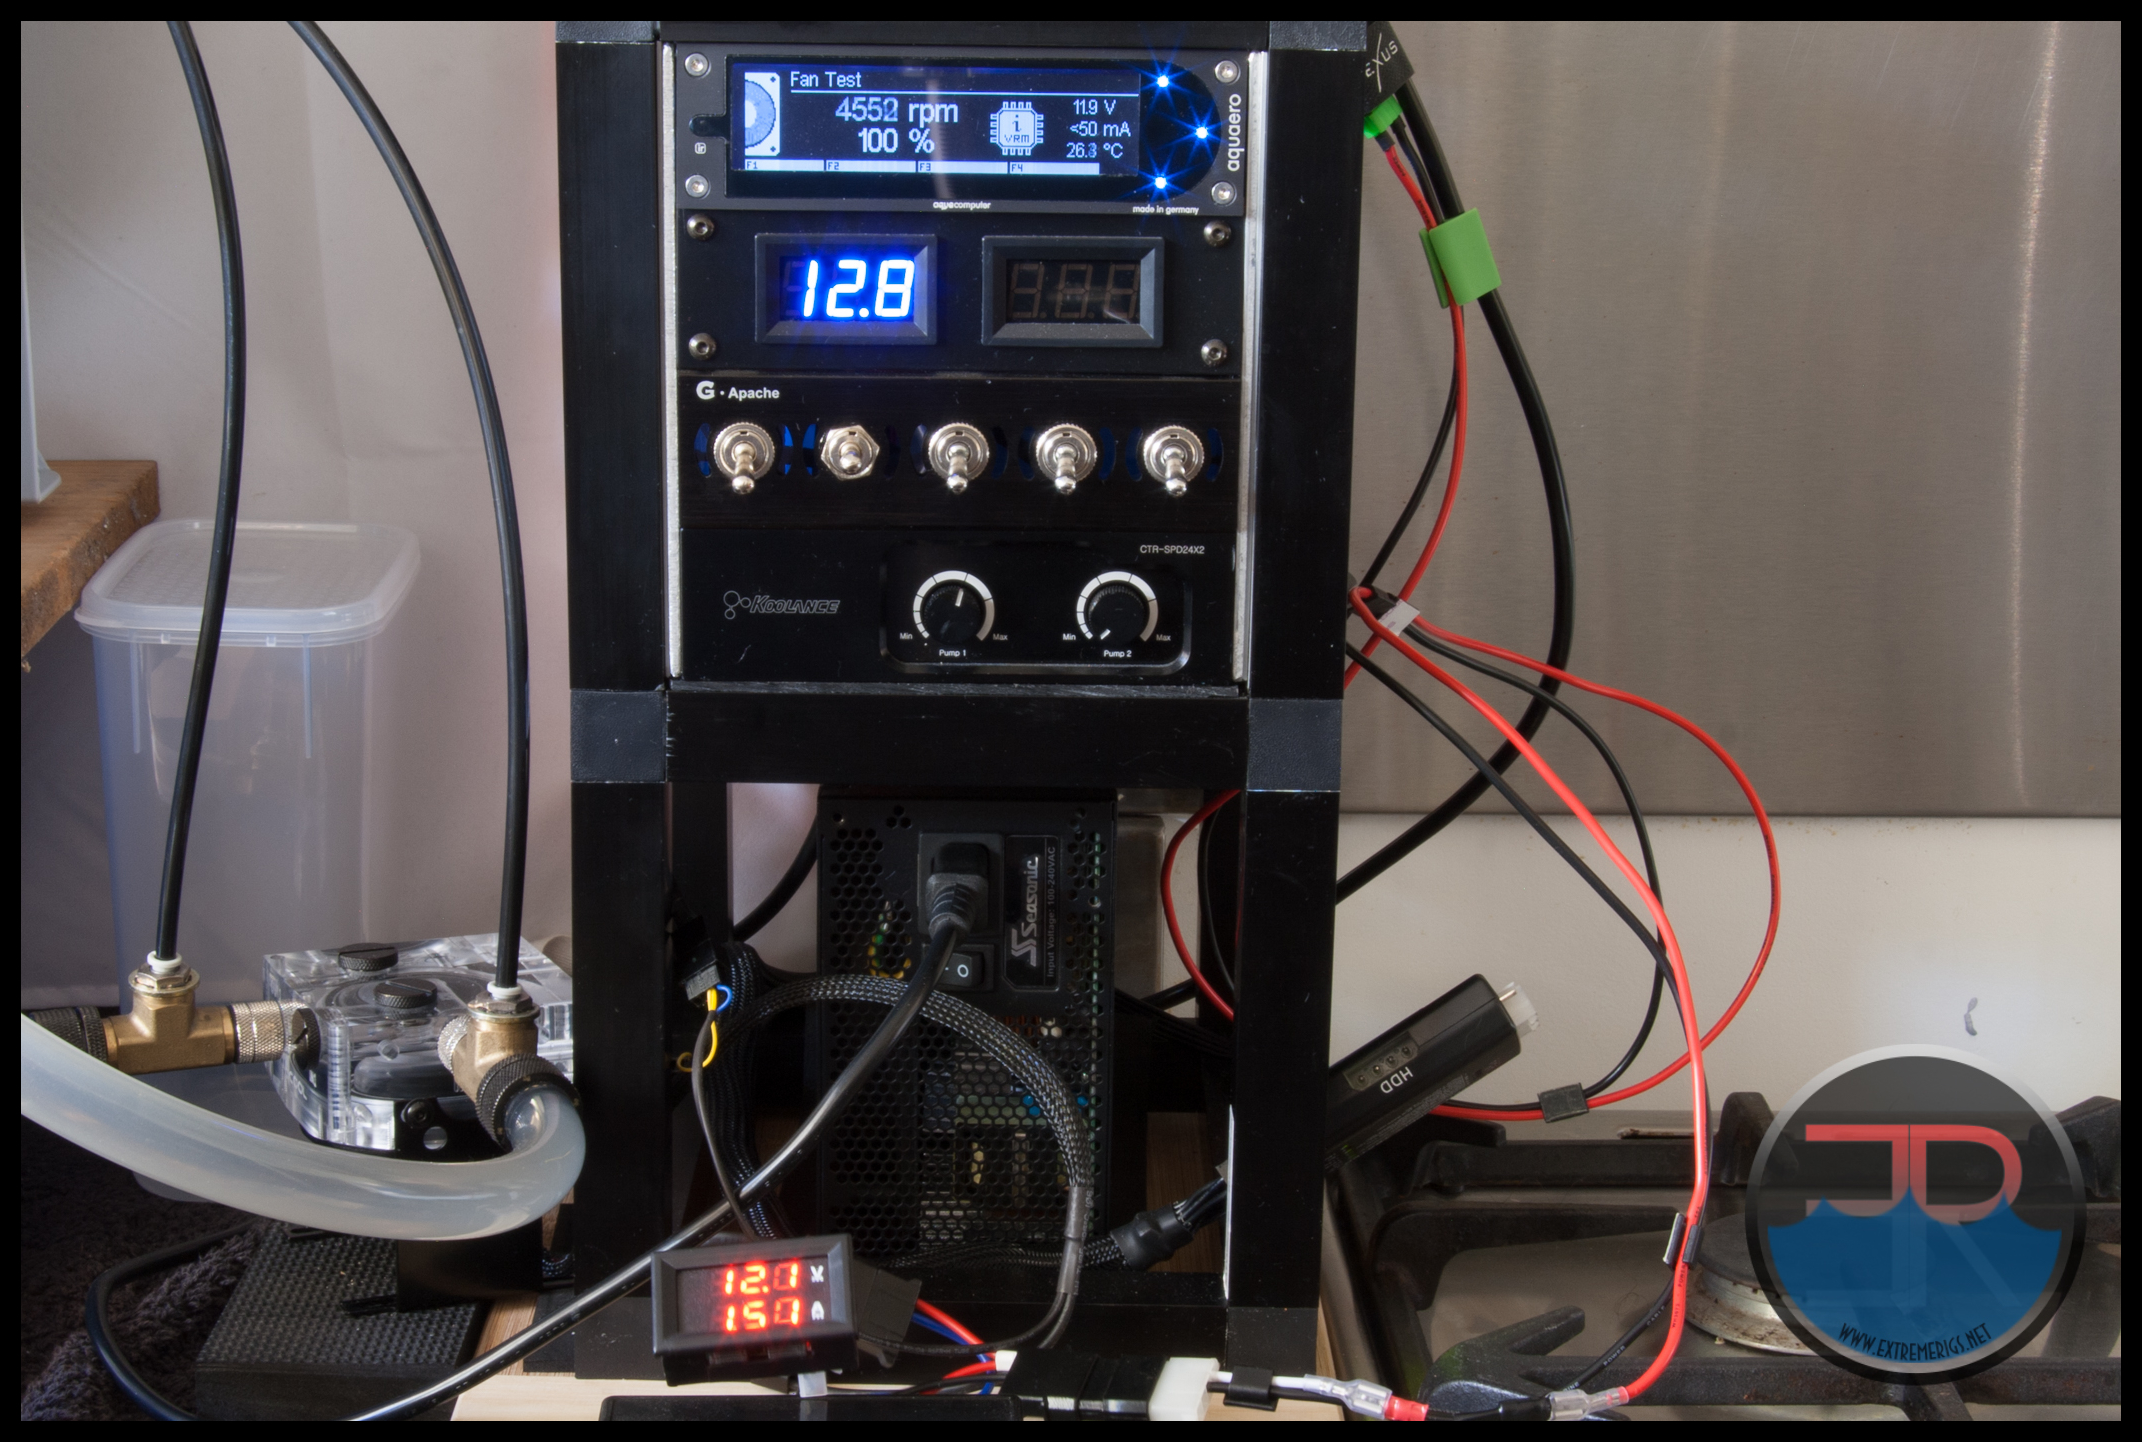 However with the VPP755, for an unknown reason the Aquaero and the pump did not seem play nicely with the pump being powered from a different PSU. So the Aquaero power pack was put into play with no problems. A digital volts amps panel meter was placed at the pump’s power connector to limit voltage at the connector to 12.1 Volts and take current readings. Control of the supplied voltage was via the Koolance CTR-SPD24X2 Pump Controller. The inline meter was used during the testing and the results displayed on the next page use these readings for the power measurement. After the readings were taken it was suggested that the current measurement might not be reading accurately because PWM controlled pumps and fans are often use current in a duty cycled fashion in line with the PWM signal. Some meters do not measure AC current accurately. So even though our data seemed almost inline with Alphacool’s power rating we hooked up the oscilloscope in an attempt to get more accurate power measurements.
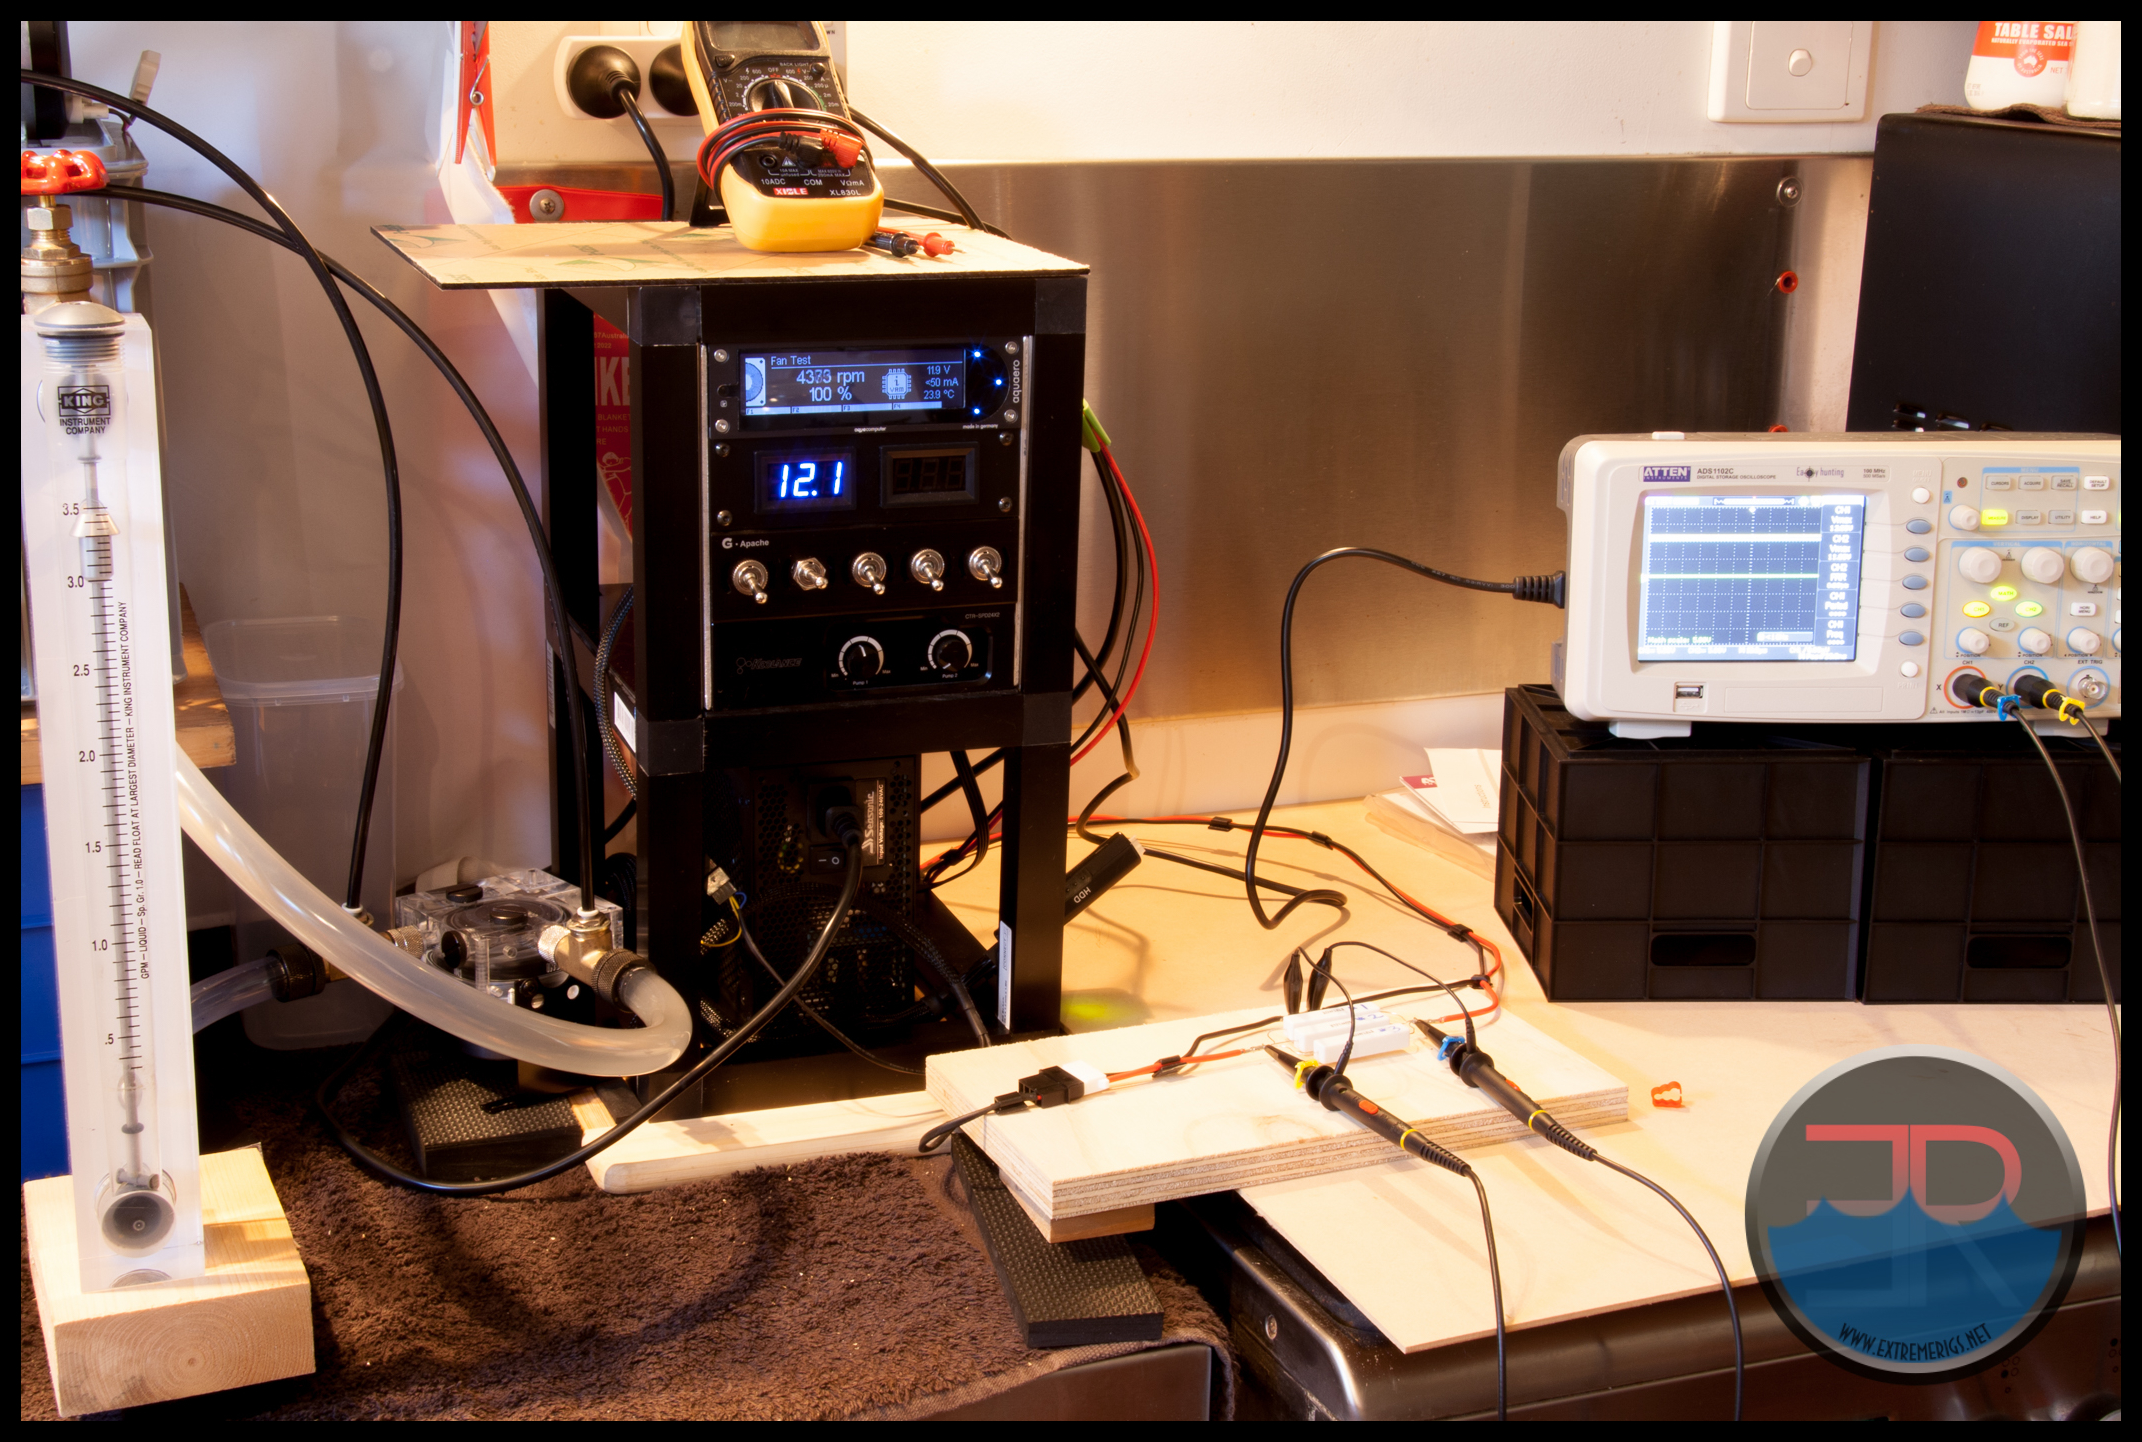 This led us down a rabbit hole of 2 days of power testing because we simply could not get a PWM waveform from the pump’s power supply to display on the oscilloscope. We needed to be sure that the Aquaero was compatible because Alphacool had told us that the VPP755 had not yet been tested with an Aquaero and we still had some issues such as jumpy rpm readings and most frustrating was that we could only get the pump to operate at 5 different speeds. Also the fact the the pump would not start at anything less than 100% PWM was a major concern.
Out gut feeling was the the VPP755 motor was not actually a PWM driven motor but instead used the PWM signal to regulate the voltage supplied to the motor. Our testing confirmed this and after querying Alphacool about the PWM, they confirmed our tests with this excerpt from their reply “the signal is being used to set the pump to one of 5 settings that are not pulsed but instead voltage controlled“. This also confirms our findings from the Aquaero testing that the motor does indeed only have 5 operating speeds, it is not fully controllable.
So we can confirm our testing was correct and that the VPP755 uses voltage adjustment to control the speed of the motor in one of 2 ways: manual adjustment with the dial on the pump OR via a PWM signal. The VPP755 does not have true PWM motor control, even though it can be controlled via PWM and it does not have a full range of control, only 5 preset voltage adjustments. When the manual adjustment is set below the maximum setting, PWM control can be used to lower the pump speed but PWM does not over-ride the manual setting to go higher.
Part of the testing mentioned above included hooking up the VPP755 to a working system and using a motherboard PWM header to control the pump via PWM. The main reason for doing this was to verify that control via the Aquero was stable and predictable and repeatable because we did notice a few odd things when using the Aquaero for control and rpm monitoring.
A very simple loop was made for the motherboard control testing and the system’s power supply was used for the pump’s power. The motherboard is an older ASRock model with a Z68 chip-set, but as long as the 4 pin fan header being used for control has actual PWM output it’s age or chip-set does not matter. The latest version of Speed Fan was utilized to control the PWM signal to the pump and monitor the resulting RPM.
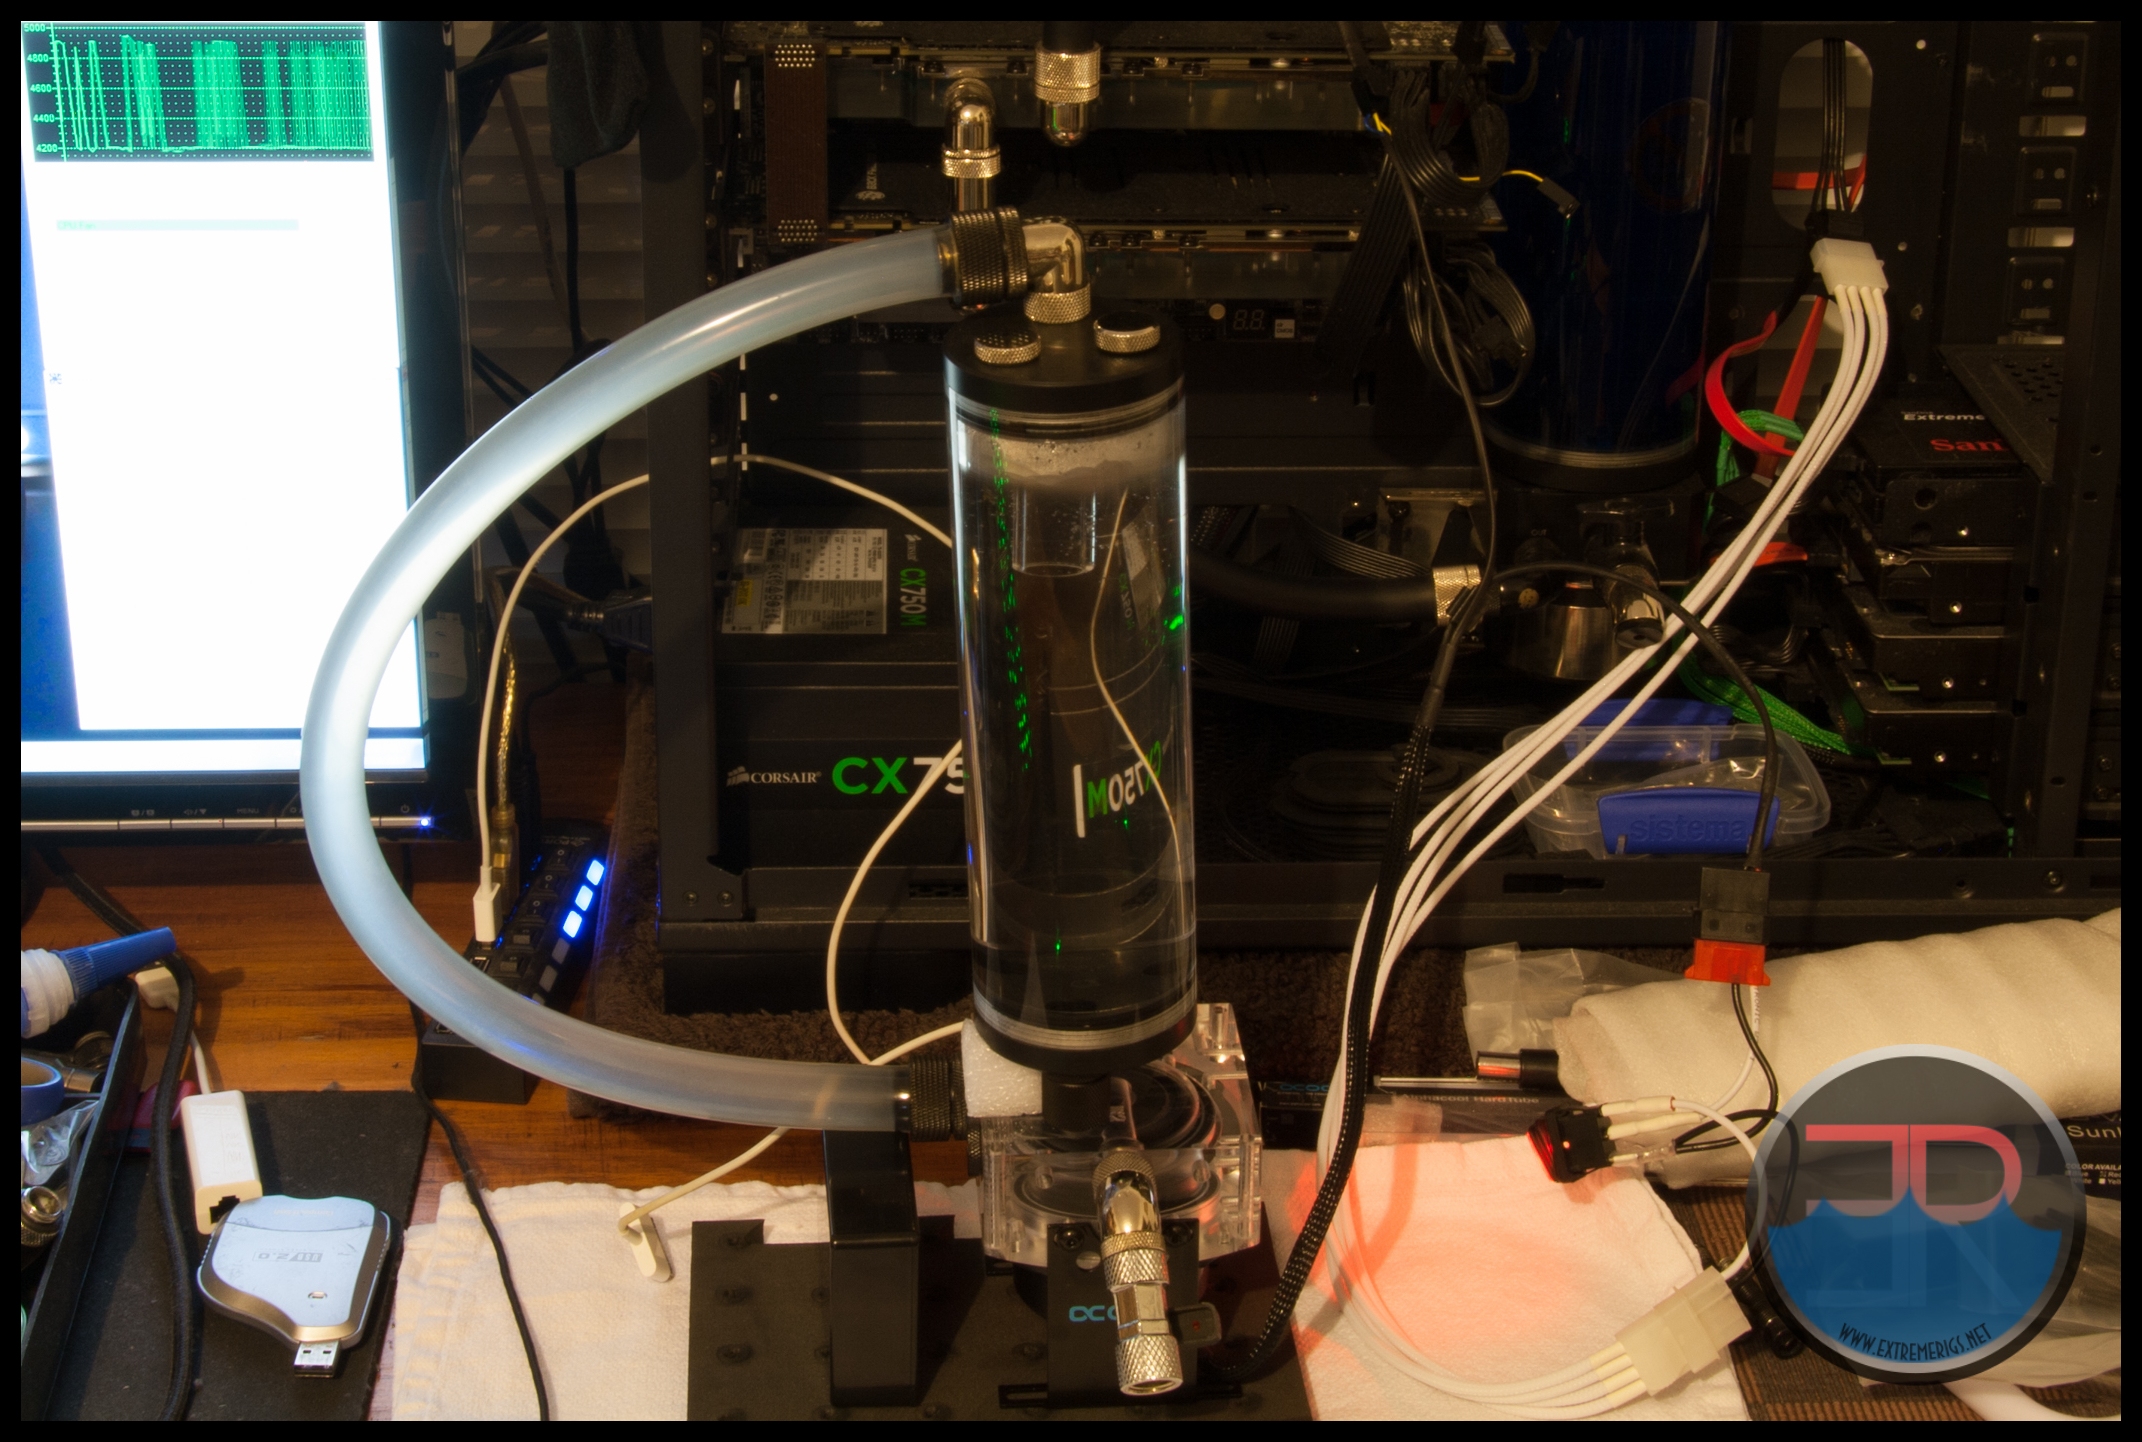 With no control over the pump’s input voltage we were left at the mercy of the Corsair power supply to feed the pump as much power as it could. Obviously it was going to be less than the 12.1 volt we were feeding it at the connector on the test bench, so we expected the maximum rpm to be lower in this test.
We’ve mentioned our concerns about the Aquaero and the VPP755 possibly not playing nicely together so the first thing to verify was if the pump could actually be successfully controlled with a PWM header and we had no issues doing this with Speed Fan.
Next was to find out if there was more than the 5 Stages of output that we were getting when the VPP755 was Aquaero controlled. To do this we adjusted the PWM signal via Speed Fan until a change in pump speed triggered an RPM reading change. This test confirmed what was found when the VPP755 was Aquaero controlled, the VPP755 has just 5 speed settings and does not have a full range of control. This test also solved another concern, jumping RPM on the Aquaero.
Let’s look at some of the Speed Fan plots to help better explain what we mean by “jumping rpm” and show why the Aquaero was not displaying a stable RPM. Each PWM setting was left to run for at least 5 minutes and a repeating RPM pattern appeared every time. The difference between the Aquaero is that it updates the rpm input numerous times per second and therefore never gives a stable reading while speed fan updates about every 5 seconds so the difference in rpm is easily noticed depending at what stage of the cycle the reading was taken.
Firstly PWM set at 0% on Speed Fan which resulted in an RPM reading between ~1632 – 1739 RPM.
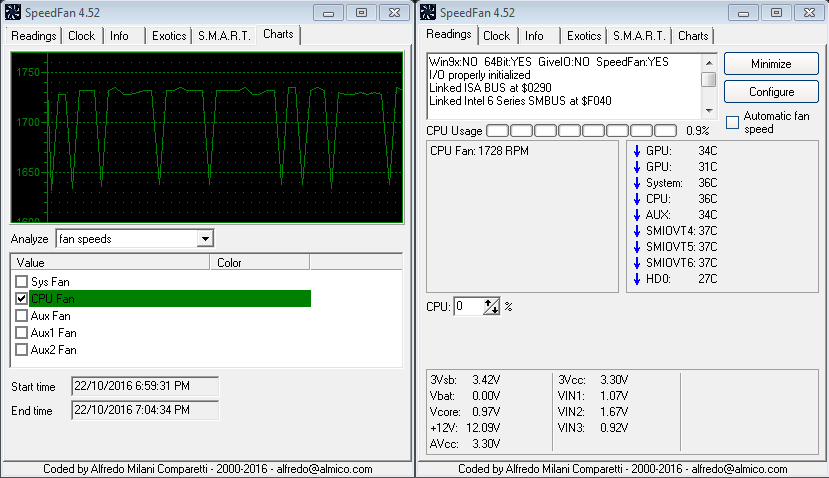 From 0% to 24% the readings and plots were the same and we called this Stage 1
At 25% Stage 2 kicked in and has RPM speeds between ~2257 and 2463
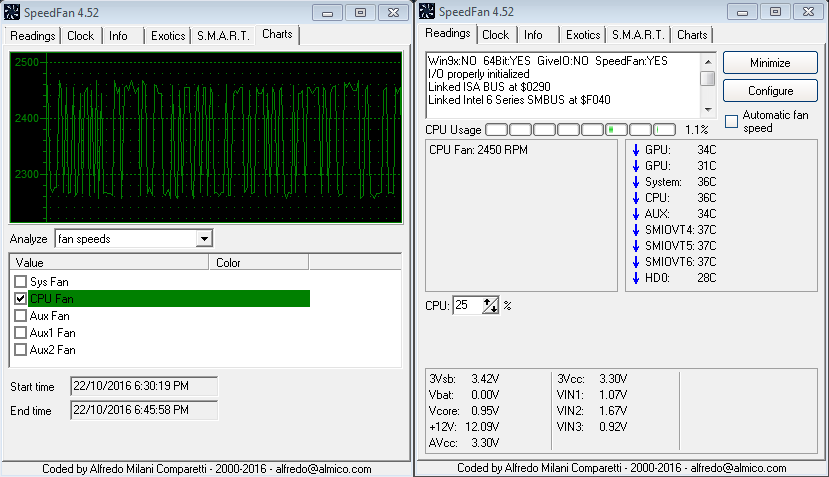 Stage 3 started at at 45% PWM and the resulting RPM ranged from ~2935 – 3276.
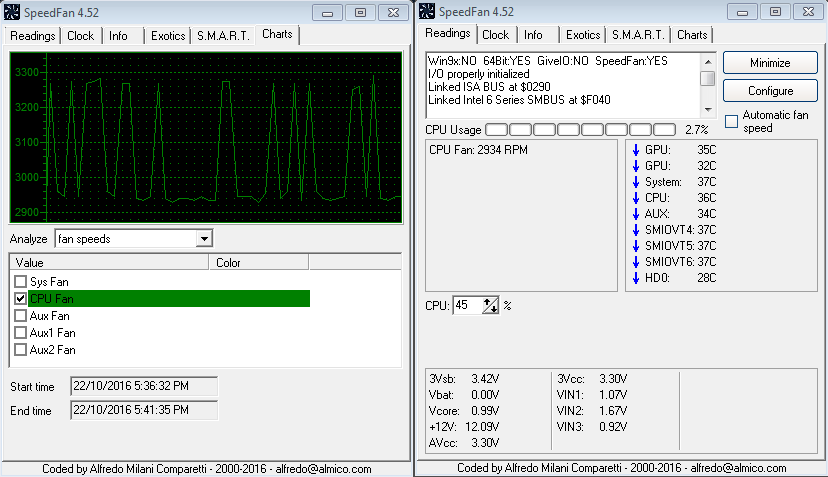 Stage 4 started at 65% with RPM between ~3658 and 4205
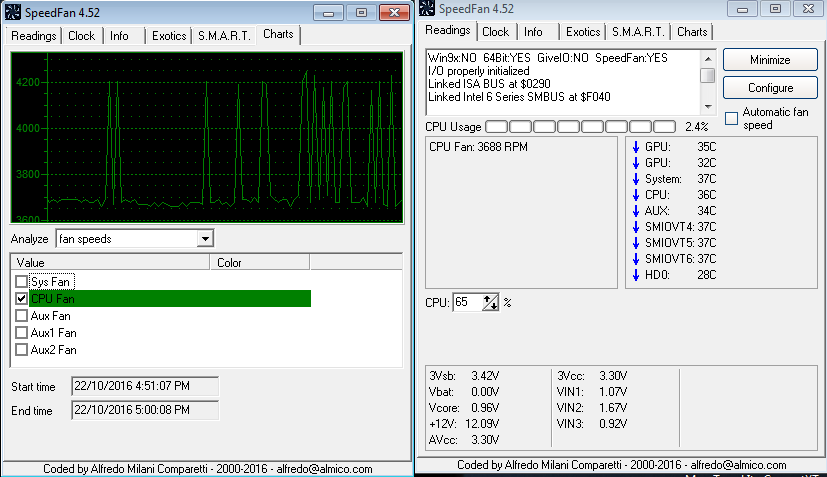 Stage 5 Starts at 85% (although the plot below is actually the 100% graph) with rpm readings between ~ 4179 and 4909. At Stage 5 it is worth noting the maximum RPM is well above the VPP755’s rating of 4500 RPM, so there is definitely a discrepancy over the rpm, either Speed Fan is interpreting the signal incorrectly or the pump rating is wrong, we suspect that 4500RPM is simply the average speed over time. Either way Speed Fan clearly shows the jumpy rpm of the VPP755 it’s not just something that is Aquaero related.
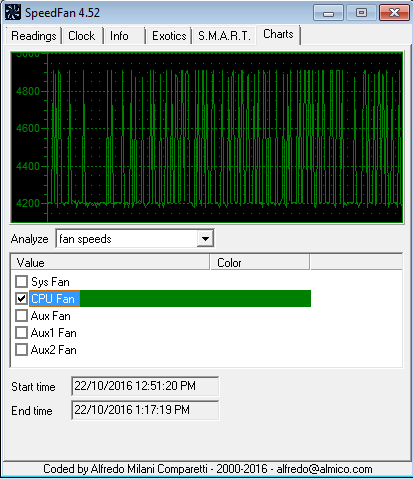 By doing the above tests the actual PWM range for each “Stage” of the VPP755 was able to be determined:
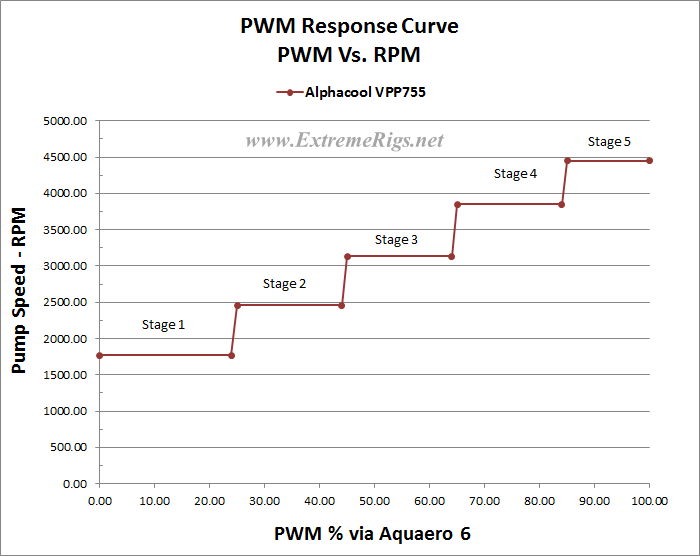
Stage 1: 0% – 24%
Stage 2: 25% – 44%
Stage 3: 45% – 64%
Stage 4: 65%- 84%
Stage 5: 85% – 100%
Changing between stages on the Aquaero was not always cleanly achievable as sometimes the resulting rpm/flow rate/pressure would bobble up and down between 2 stages, although this was not repeatable and seemed a random occurrence. There was no bobbling with Speed Fan control and the stage changes were clear cut every time.
After the individual PWM/RPM readings were taken to find the trigger points for stage changes I did a run through from pump off, up through the stages using the PWM settings 15, 35, 55, 75 and 95 which are central to each stage’s trigger point.
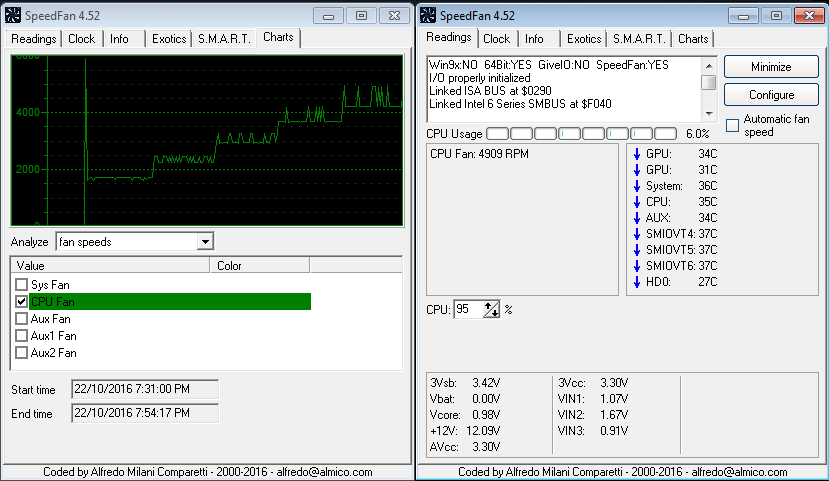 The five stages are clearly shown, as is the jumpy rpm which appears to gain greater high and low points as the pump speed increases.
Of special interest in the above plot is the point where the pump was turned on. Notice the high rpm spike where the pump got full power to start up with despite being set on 15% PWM via Speed Fan. This proved that the pump would start on lower PWM settings which was not the case when controlled with the Aquaero.
While hooked up to the PC I also checked control with the ASRock Bios. I suspected the pump would start up at full speed until the BIOS kicked in and adjusted the speed according to the BIOS setting that was last saved. This turned out to be exactly what happened.
Checking each of the 9 fan speed settings that the ASRock BIOS offered I was somewhat surprised that I was unable to engage each of the 5 stages of the pump. This appeared to be a BIOS issue and the VPP755 does not seem to be at fault.
BIOS Speed Levels 1, 2, 3 & 4: Pump runs at Stage 3.
BIOS Speed Levels 5,6 & 7: Pump runs at Stage 4.
BIOS Speed Levels 8 & 9: Pump runs at Stage 5.
We can not confirm that the an Aquaero controlled VPP755 will start at less than 100% PWM, however given the start-up spike to full rpm witnessed with the Speed Fan graph, and that the pump ran at full speed until motherboard BIOS kicked in, it is a reasonable conclusion to make that the VPP755 will run at full speed when the system is turned on until the Aquaero boots and takes control, lowering the PWM to whatever it was set at previously.
Manual Control
After all that PWM testing we finally got to the manual adjuster dial on the bottom of the VPP755. Had we done this first we probably would have been just as confused as we were when PWM control was first tried.
The adjuster dial controls the motor speed so the resulting output is the same 5 stages as we found with the PWM control. Full adjustment is not possible, only the 5 stages with 4 trigger points that vary the pump speed as the dial is turned up or down.
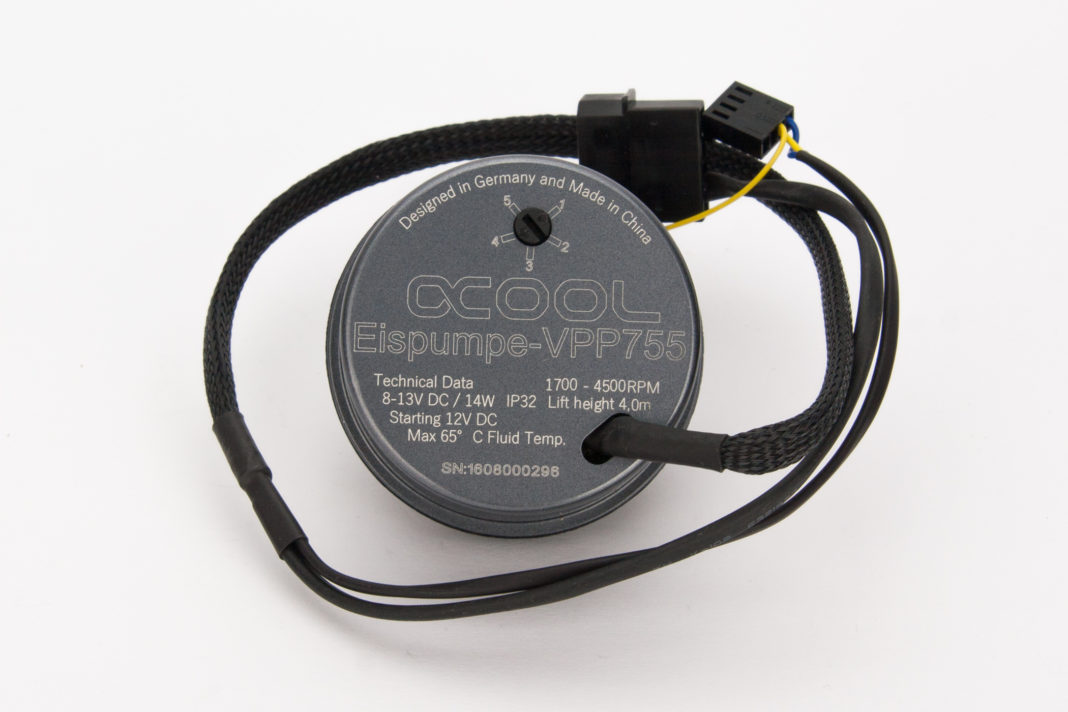
A scale of 1 – 5 is provided as a guide for setting the pump speed with 1 as the lowest and 5 as the highest. A flat blade screwdriver (or similar) is needed to turn the dial to the required setting. Turn the dial so the part of the slot left in tact is facing the number on the scale you want to set. The dial movement feels good with just the right amount of resistance so it feels like you are turning something to make an adjustment.
Stage 1 is selected by having the dial set between 1 and ~1.9 on the manual control dial.
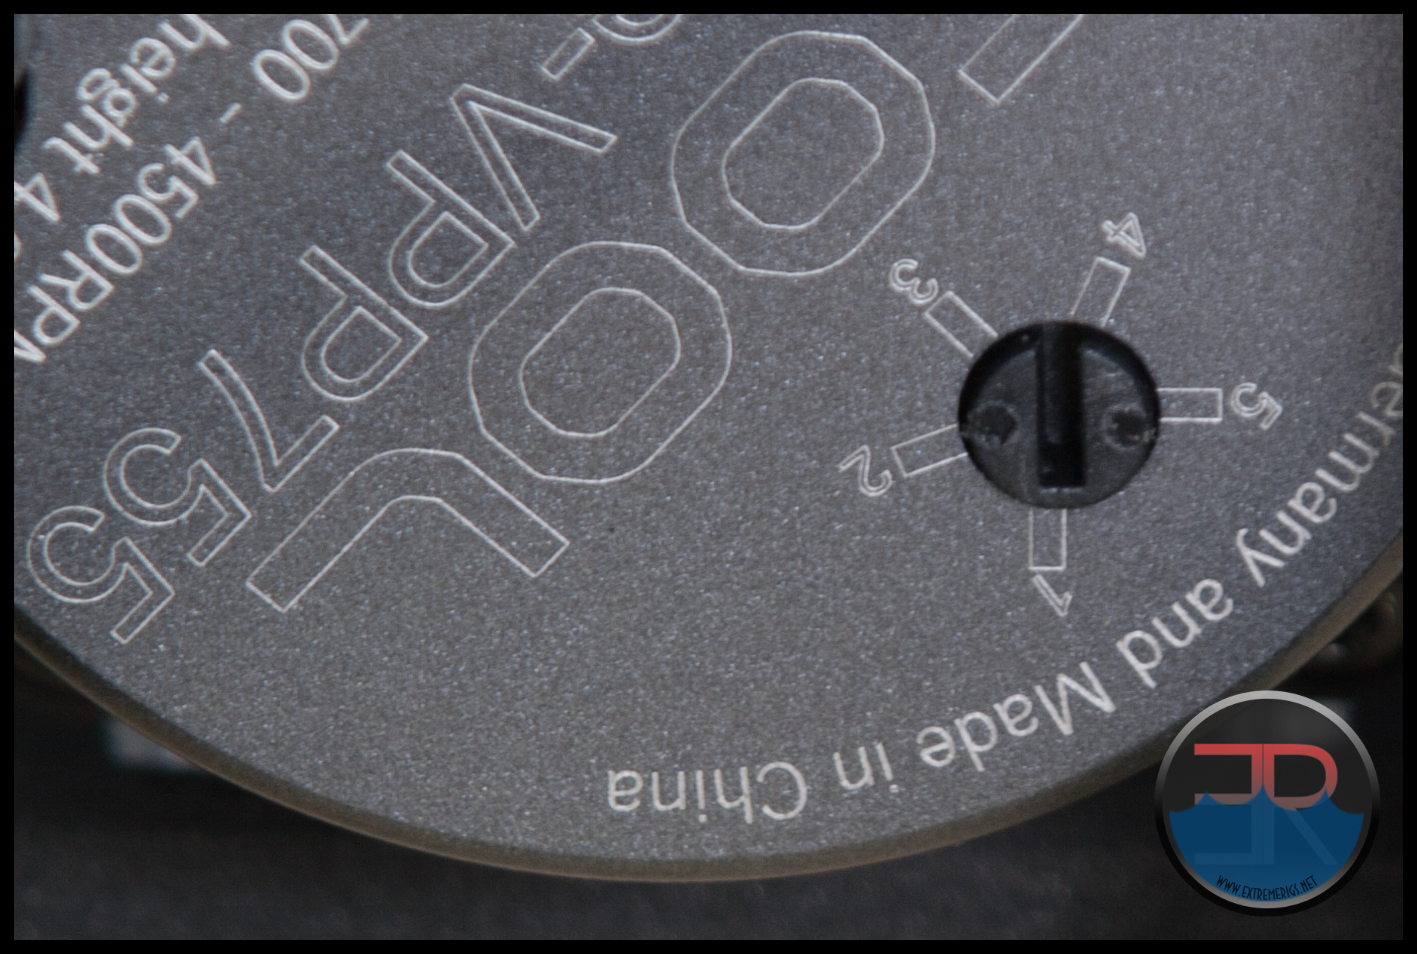 Stage 2 is triggered at ~1.9 on the dial and runs through to about 2.7
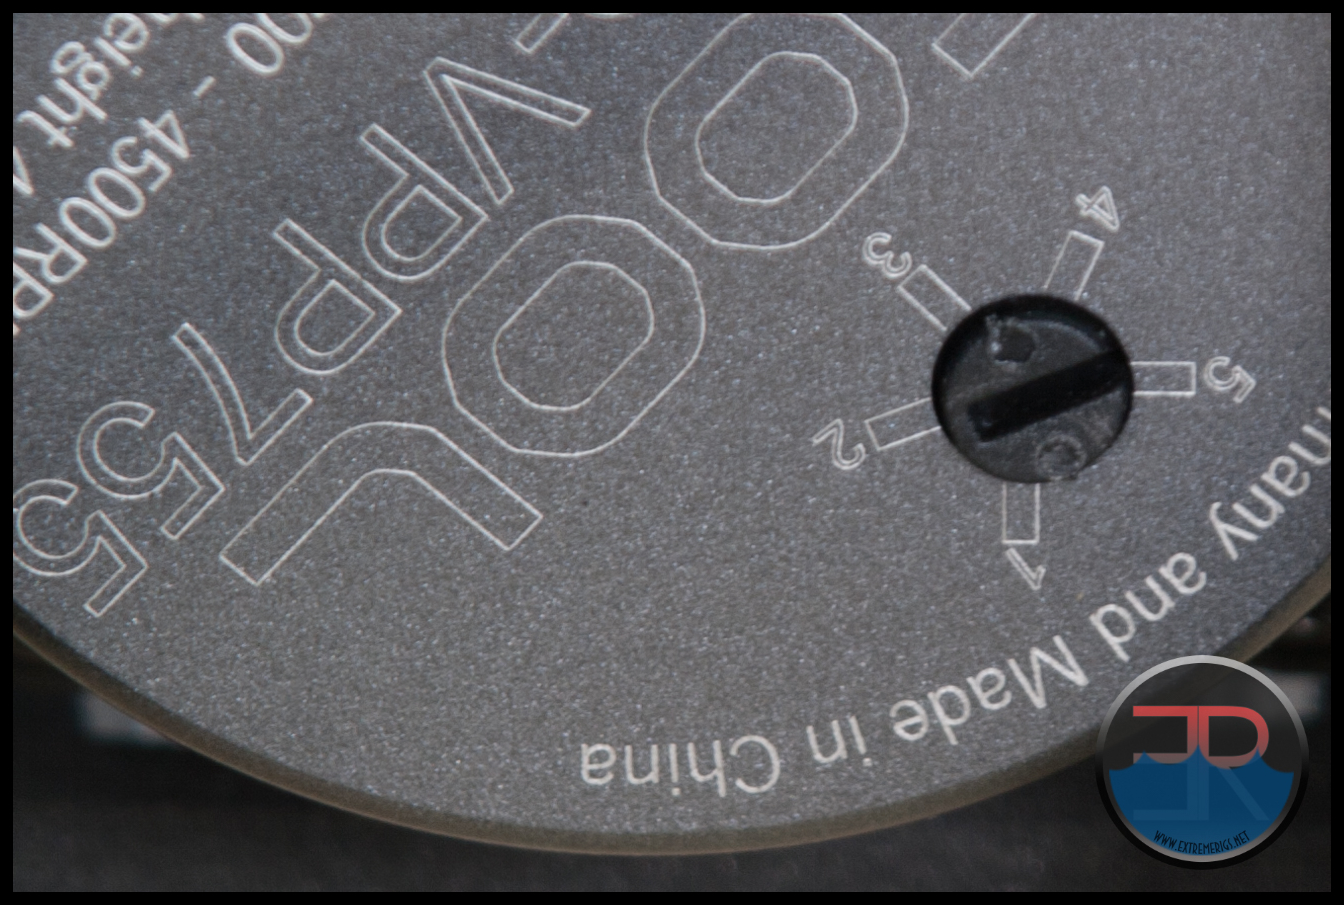 The Stage 3 trigger is at ~2.7 and runs to ~3.3 on the dial indicator.
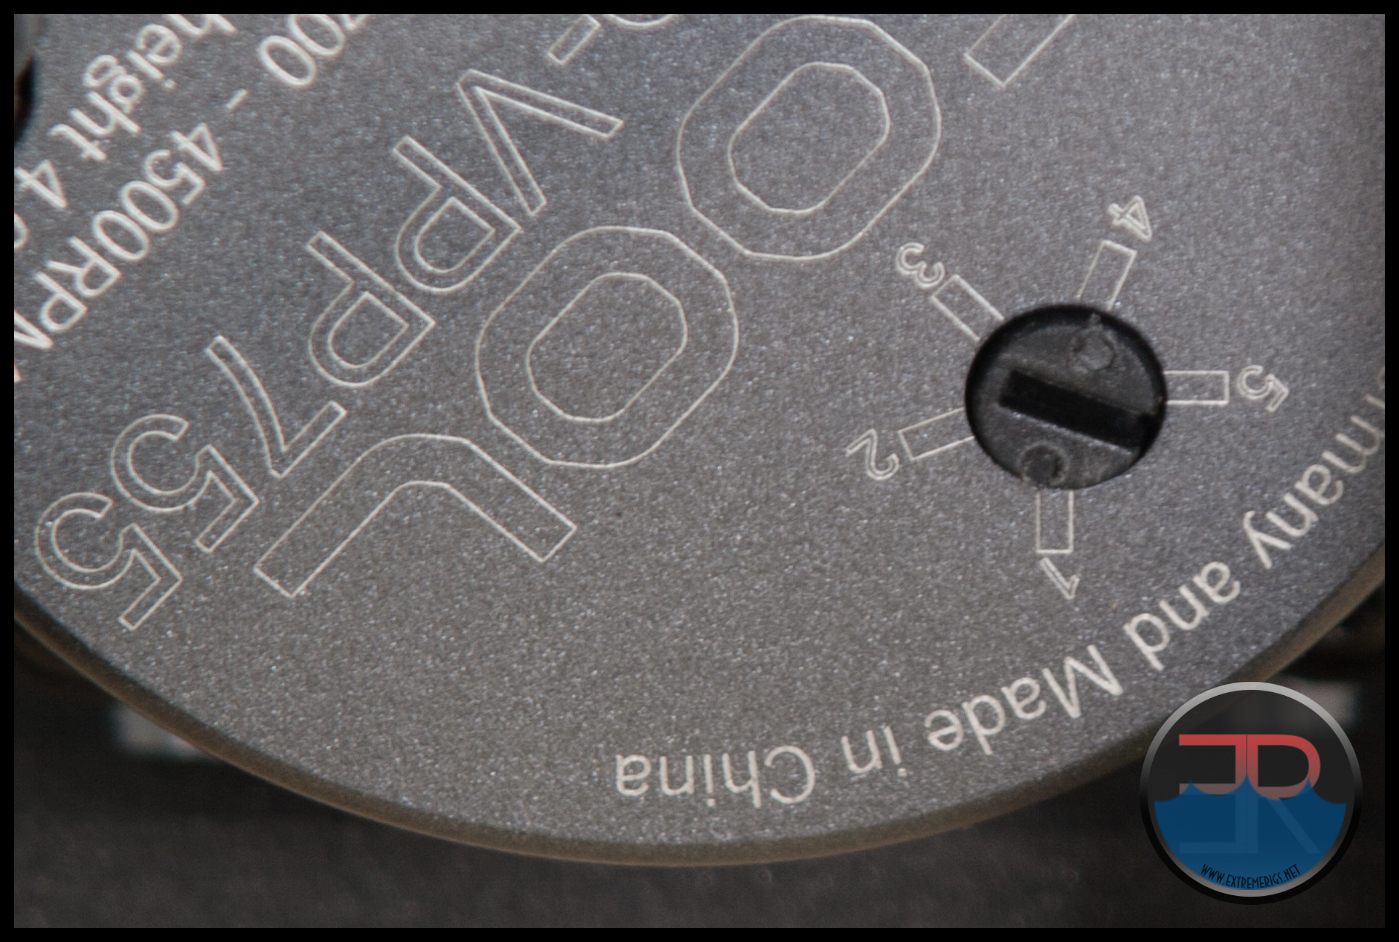 The Stage 4 trigger is at ~3.3 and runs to ~4.1
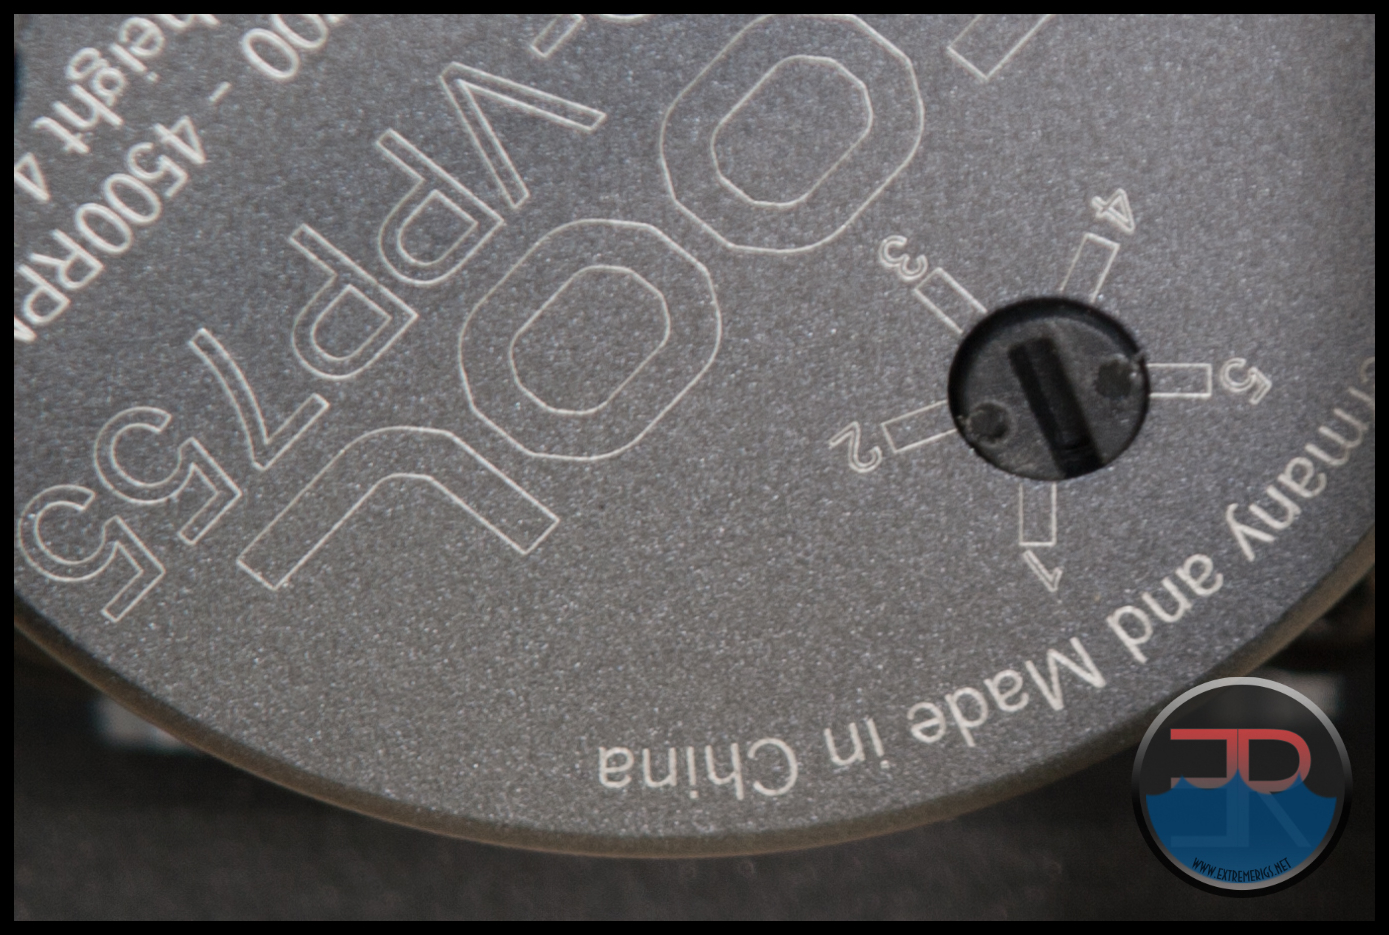 Stage 5 is triggered at ~4.1 on the dial and runs through to 5 which is the speed scale maximum.
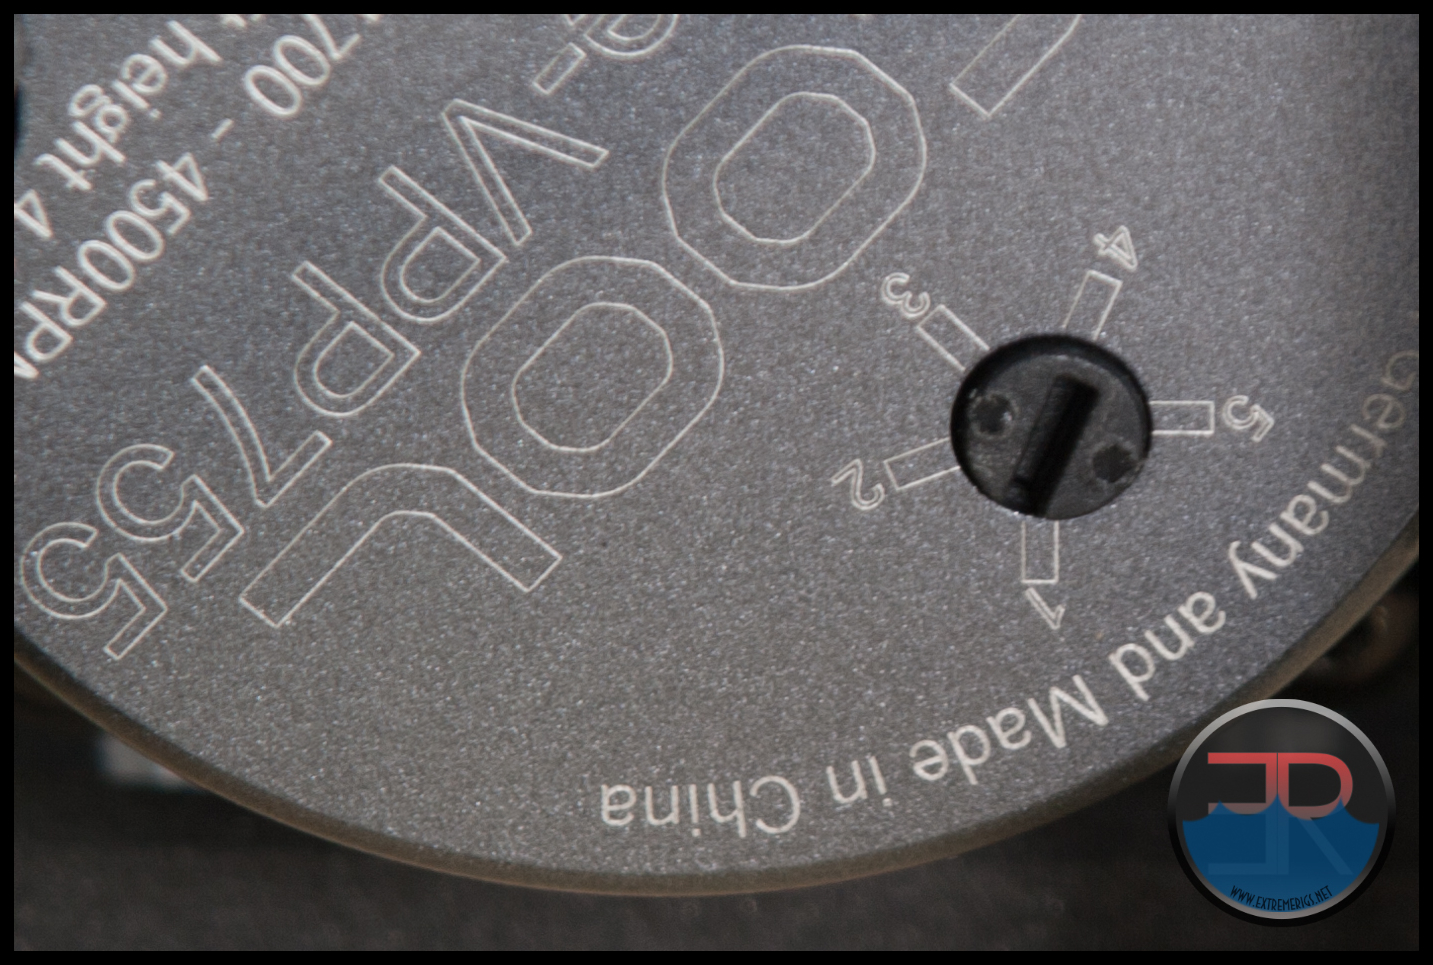 You can control the pump speed via PWM with the manual dial in any position, but you can only control the pump stage between the minimum and the current manual stage setting.
For example if you have the manual dial set on ~4, Stage 4 pump speed would be active, now you can PWM control the pump speed up and down anywhere form stage 1 to stage 4, but stage 5 could never be activated because the manual dial has the over-riding limitation to speed control.
This final plot has been derived from the sound testing data and displays the “approximate” RPM for PWM setting. i.e the PWM response curve.
We certainly ended up testing more than we expected to for controlling the VPP755. After everything we did, we feel confident in saying that the VPP755 is a voltage controlled pump that has both manual control and electronic control via PWM. We were expecting the VPP755 to be a true PWM pump but that is not the case. More disappointing to us was that the implemented control system limits the pump to 5 stages of pump speed. The idea of dual control was exciting but the implementation on the VPP755 leaves us feeling it could have been done better. Maybe this will improve in a future revision.
Something of interest which I discovered after all the testing was complete and this review was submitted for publishing, was that there is a way to get almost full control of the pump speed. It does however rely on being able to vary the voltage being supplied to the pump, and does not depend on the pumps own control system. I only tried this with the pump set on Stage 5, but I assume it would also work when set on lower stages.
Starting with 12.1 Volts on Stage 5, I slowly started to lower the voltage to the pump and low and behold the pump speed decreased as I did so. I have no idea why I didn’t previously try this, but I was pleasantly surprised that I did. Better late then never as the saying goes. The bench was not properly set up to fully investigate this last minute finding as I was only “wet testing” a couple of pump tops from other manufacturers. I suspect with a Koolance pump controller or Aqua Computer Power Adjust Ultra (possibly even a fan controller that has sufficient current capacity) you would be able to dial in just about any pump speed you wanted when used in combination with the 5 stages of internal control. I had given up on the idea of using the VPP755 on one of the Extreme Rigs test benches, but it now seems likely the VPP755 will be put into service. I’ll endevour to update the review with a more complete report on this, along with some readings from different Stages, Volts and the resulting pump speeds.
And after having said all that, we question how important is the control system anyway when a pump is a “set and forget” component. Still the testing had to be done.
Let’s see how the VPP755 pump performs.





“What the VPP755 does not have yet is a proven track record for reliability”
Just offer a generous warranty, standing by the product.
Yeah and to be fair to Alphacool they claim that it has the same lifetime rating. So all things look good. However I’d always take a product known to last a long time than one that doesn’t even if the latter comes with a warranty. A pump dying can cause all sorts of hassles and I like my rigs to have high uptime and be foolproof cause I don’t have time to fiddle about much
The exact reason I switched to a D5, my ST mcp50x died after 9 months.
Alphacools false promises like being a true pwm pump & full compatability with existing tops is a major turn off. I’ll consider one when I can choose my own pump top and it actually has true pwm control. Until then ill stick with my Aqua Computer D5 pump motor with PWM input and speed signal.
[…] is all Ice (“Eis”) related. We recently reviewed the Eisbrecher radiator and the Eispumpe VPP755 along with it’s Eisdecke pump top. So we have already covered a fair amount of the new product line up. Neither the Eisbrecher […]
I just received my setup for my dual loops and after putting everything together for the pump/res and testing it for anyone needing to know the Alphacool VPP755 works in the Monsoon MMRS pump/res combo albeit about 2mm short with the o-ring provided by monsoon, but all i had to do was us a extra o-ring and slid it around the D5 cover by monsoon and it fit right in the gap and covers it so you don’t even notice it. I ran it for the first time yesterday and had no leaking issues, now that’s not to say it won’t later on but preliminary testing on my part went smoothly, also it is more quiet than any other pumps i’ve tried and it seems to be a strong pump will know more after testing it more, just FYI for anyone looking to use Monsoons system. Hope this helps.
Those considering buying this may want to wait until Alphacool fixes noise issues. Tons of reports: http://www.overclock.net/t/1624192/alphacool-vpp755-noise
Will this work in a 360mm rad for a CPU and 1 GPU block?
Yes for most common cpu and gpu blocks this will be plenty.
Comments are closed.