To check the airflow we will be doing some loaded cpu temperature tests to see how much the coolant/air temperatures change vs an open air test bench.
The 5820K was loaded with Prime95 at stock clocks. The GPU was idle. 6 air temperatures sensors were attached around the intake of the EK Vardar fans mounted to the PE 240 radiator in push. The pump was a DDC 3.2 PWM. 4 air temperature sensors were attached around the bottom air intake on the case. No additional fans were mounted to the chassis. The only chassis fan therefore was the supplied In Win fan. The air temperature sensors were logged by a seperate PC using a crystalfontz unit. The coolant sensor was plugged into the motherboard. Pump and fans were controlled by the motherboard – however very quickly both were running at maximum RPM anyway.
Let’s start off with the open air bench for a sanity check – Radiator input air temperatures should match ambient:
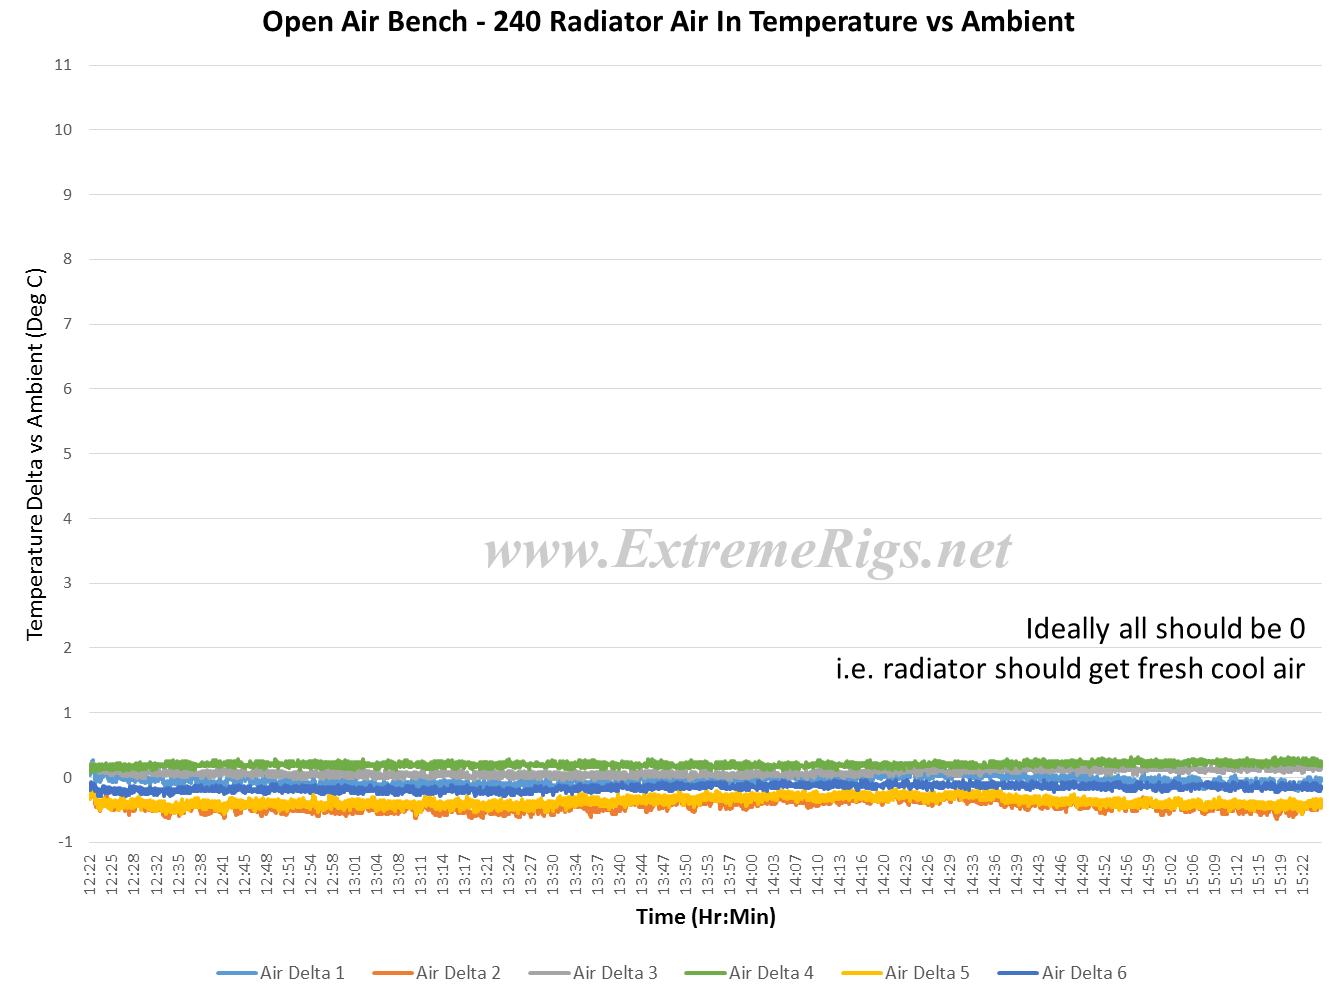
So the open air bench is running as we expect – how does the chassis effect the radiator air temperatures:
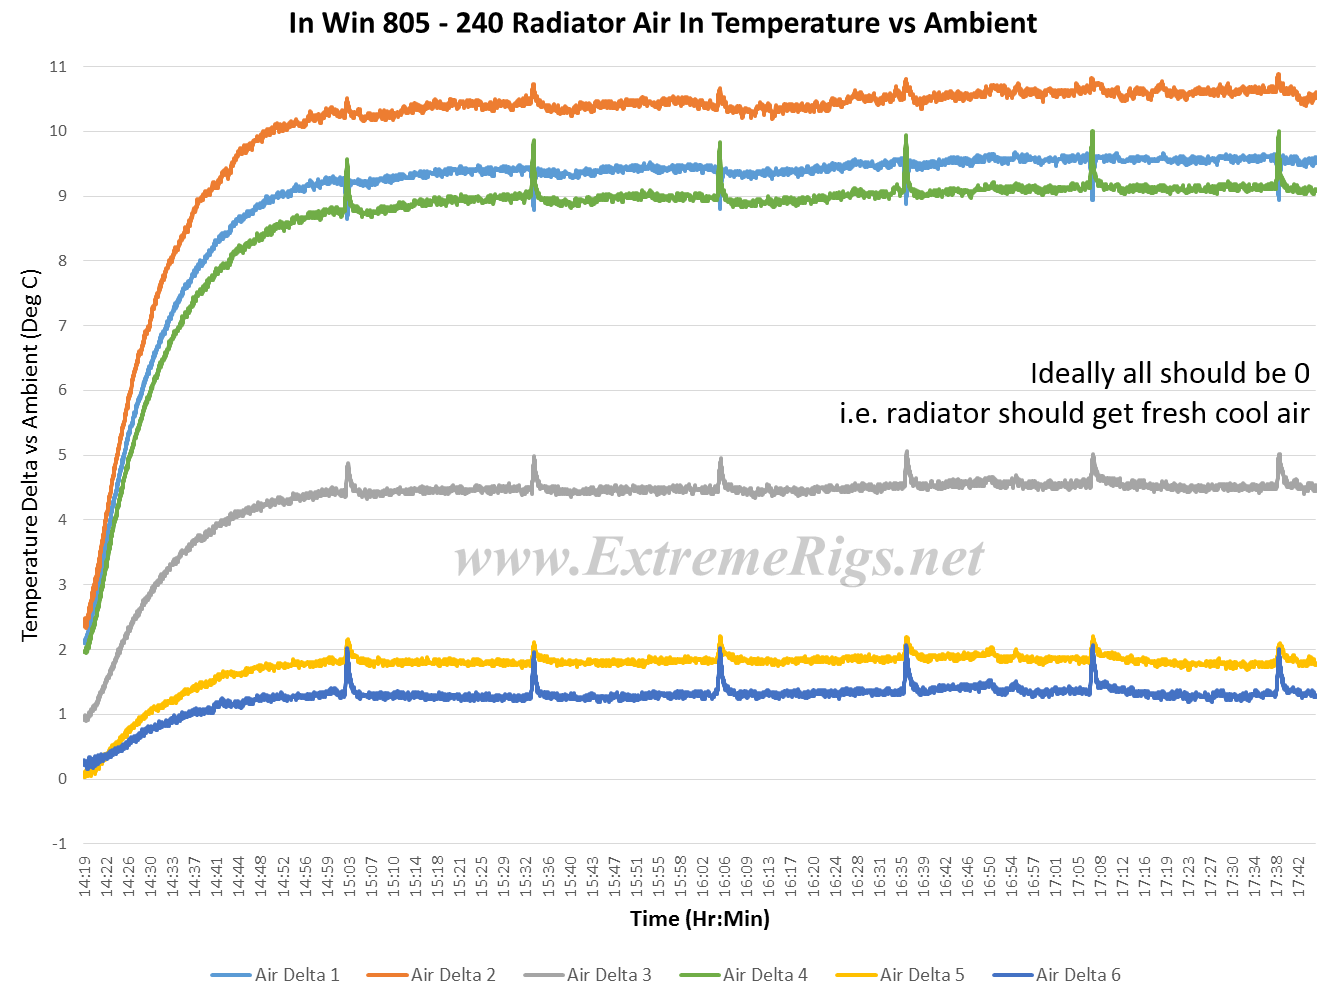
Clearly the effect is quite strong though it can take most of an hour to fully heat up – the chassis is essentially a hotbox. Some of the radiator was being fed with air 10C hotter than ambient. Indeed measuring the exhaust fan of the case we saw it pushing out air at 47C! Two of the sensors though – presumably the ones close to the bottom of the chassis – are being fed with reasonably fresh air.
So clearly things are not as happy as we’d like, but air temperatures only give an idea of how things translate into actual cooling of the CPU. Let’s next look at the coolant delta i.e. how well does the radiator do when fed with that air. Now that we’ve seen how the data settles let’s simplify the plots and focus on the average of the third hour from each data set:
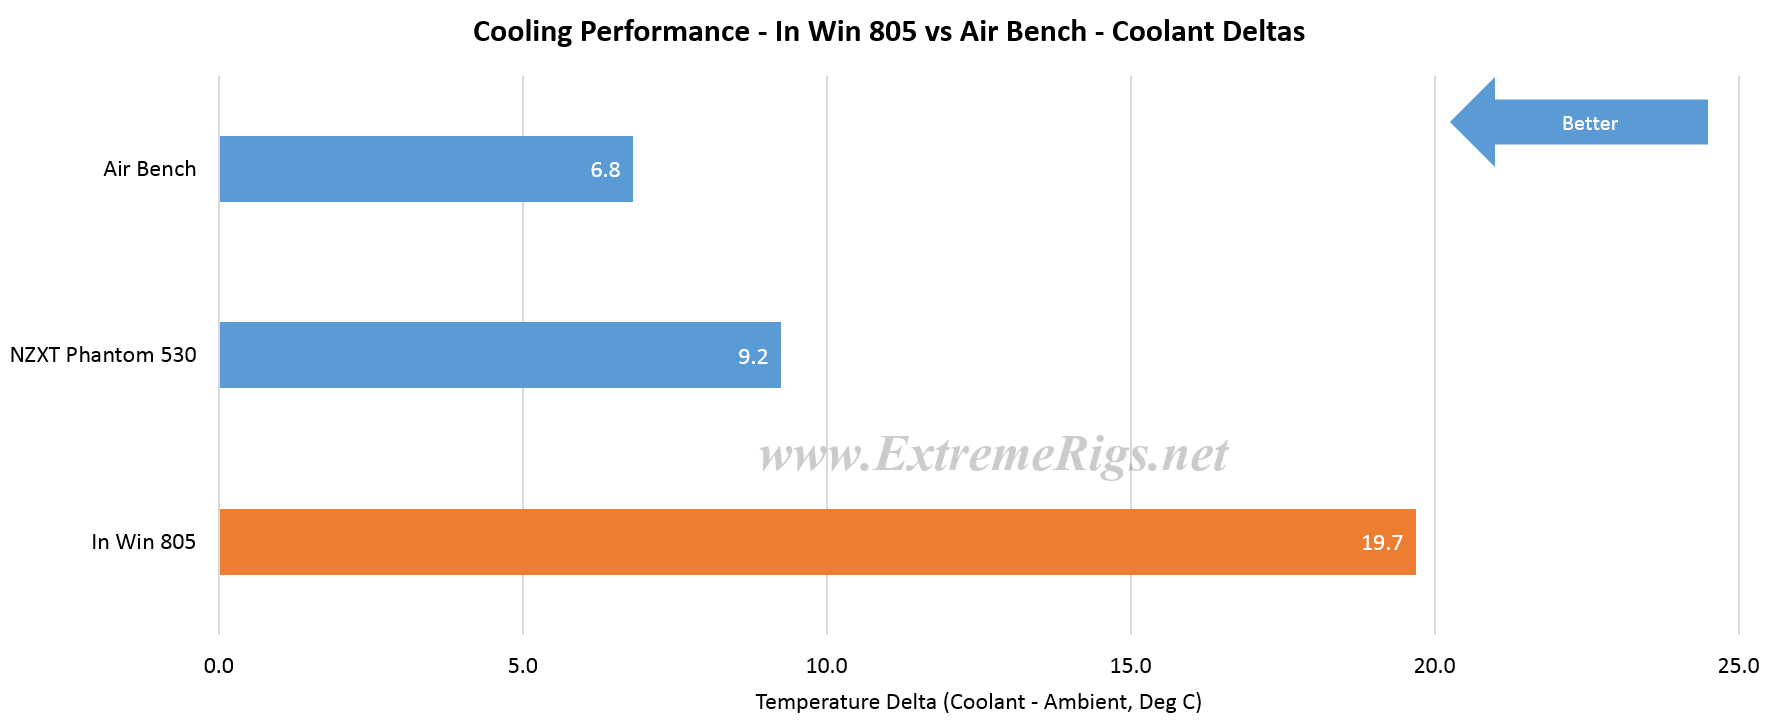
Coolant at about 7C over ambient seems reasonable for a thin 240 radiator with one bank of fans. The Phantom was setup with the same 240 radiator exhausting out the top while the intake to the case was the supplied 200mm fan mounted in the front. Therefore it was receiving air warmed by the motherboard rather than fresh ambient air. The In Win of course used the supplied 240mm rad mount with the fans in push. The only chassis fan was the supplied In Win exhaust fan. That fan is quite low RPM ~1200 and can’t really handle maintaining enough airflow through the case to keep temperatures down.
Coolants are of course far higher relative to ambient – nearly 20C now instead of 7C. Coolant this high can be a concern because tube becomes more elastic meaning it can lose it’s grip on a barb. Tube also ages faster at higher tempertatures and will need replacing more often. It’s quite essential to have some form of lockring i.e. a compression fitting or a worm clamp to make sure that tube will not come loose when running such high coolant temperatures.
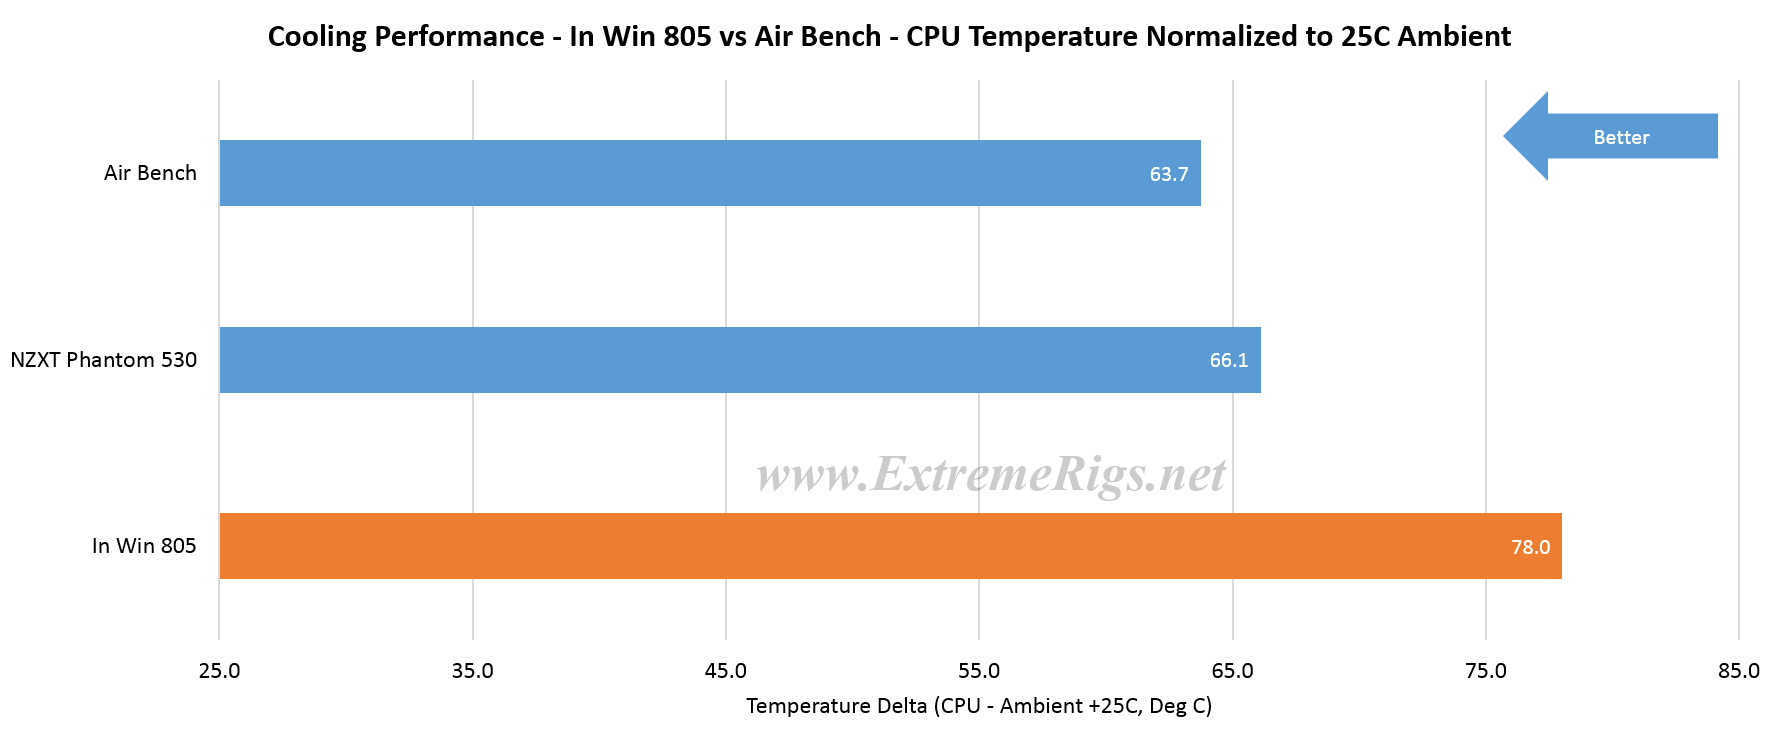
Lastly let’s take a look at the resultant effect on the CPU temperatures:
As expected the coolant almost linearly adds to the CPU temperaure. As we are running a stock CPU here then we have plenty of room for temperatures to grow, but such a delta might limit your overclocking simply because the CPU would get too hot.


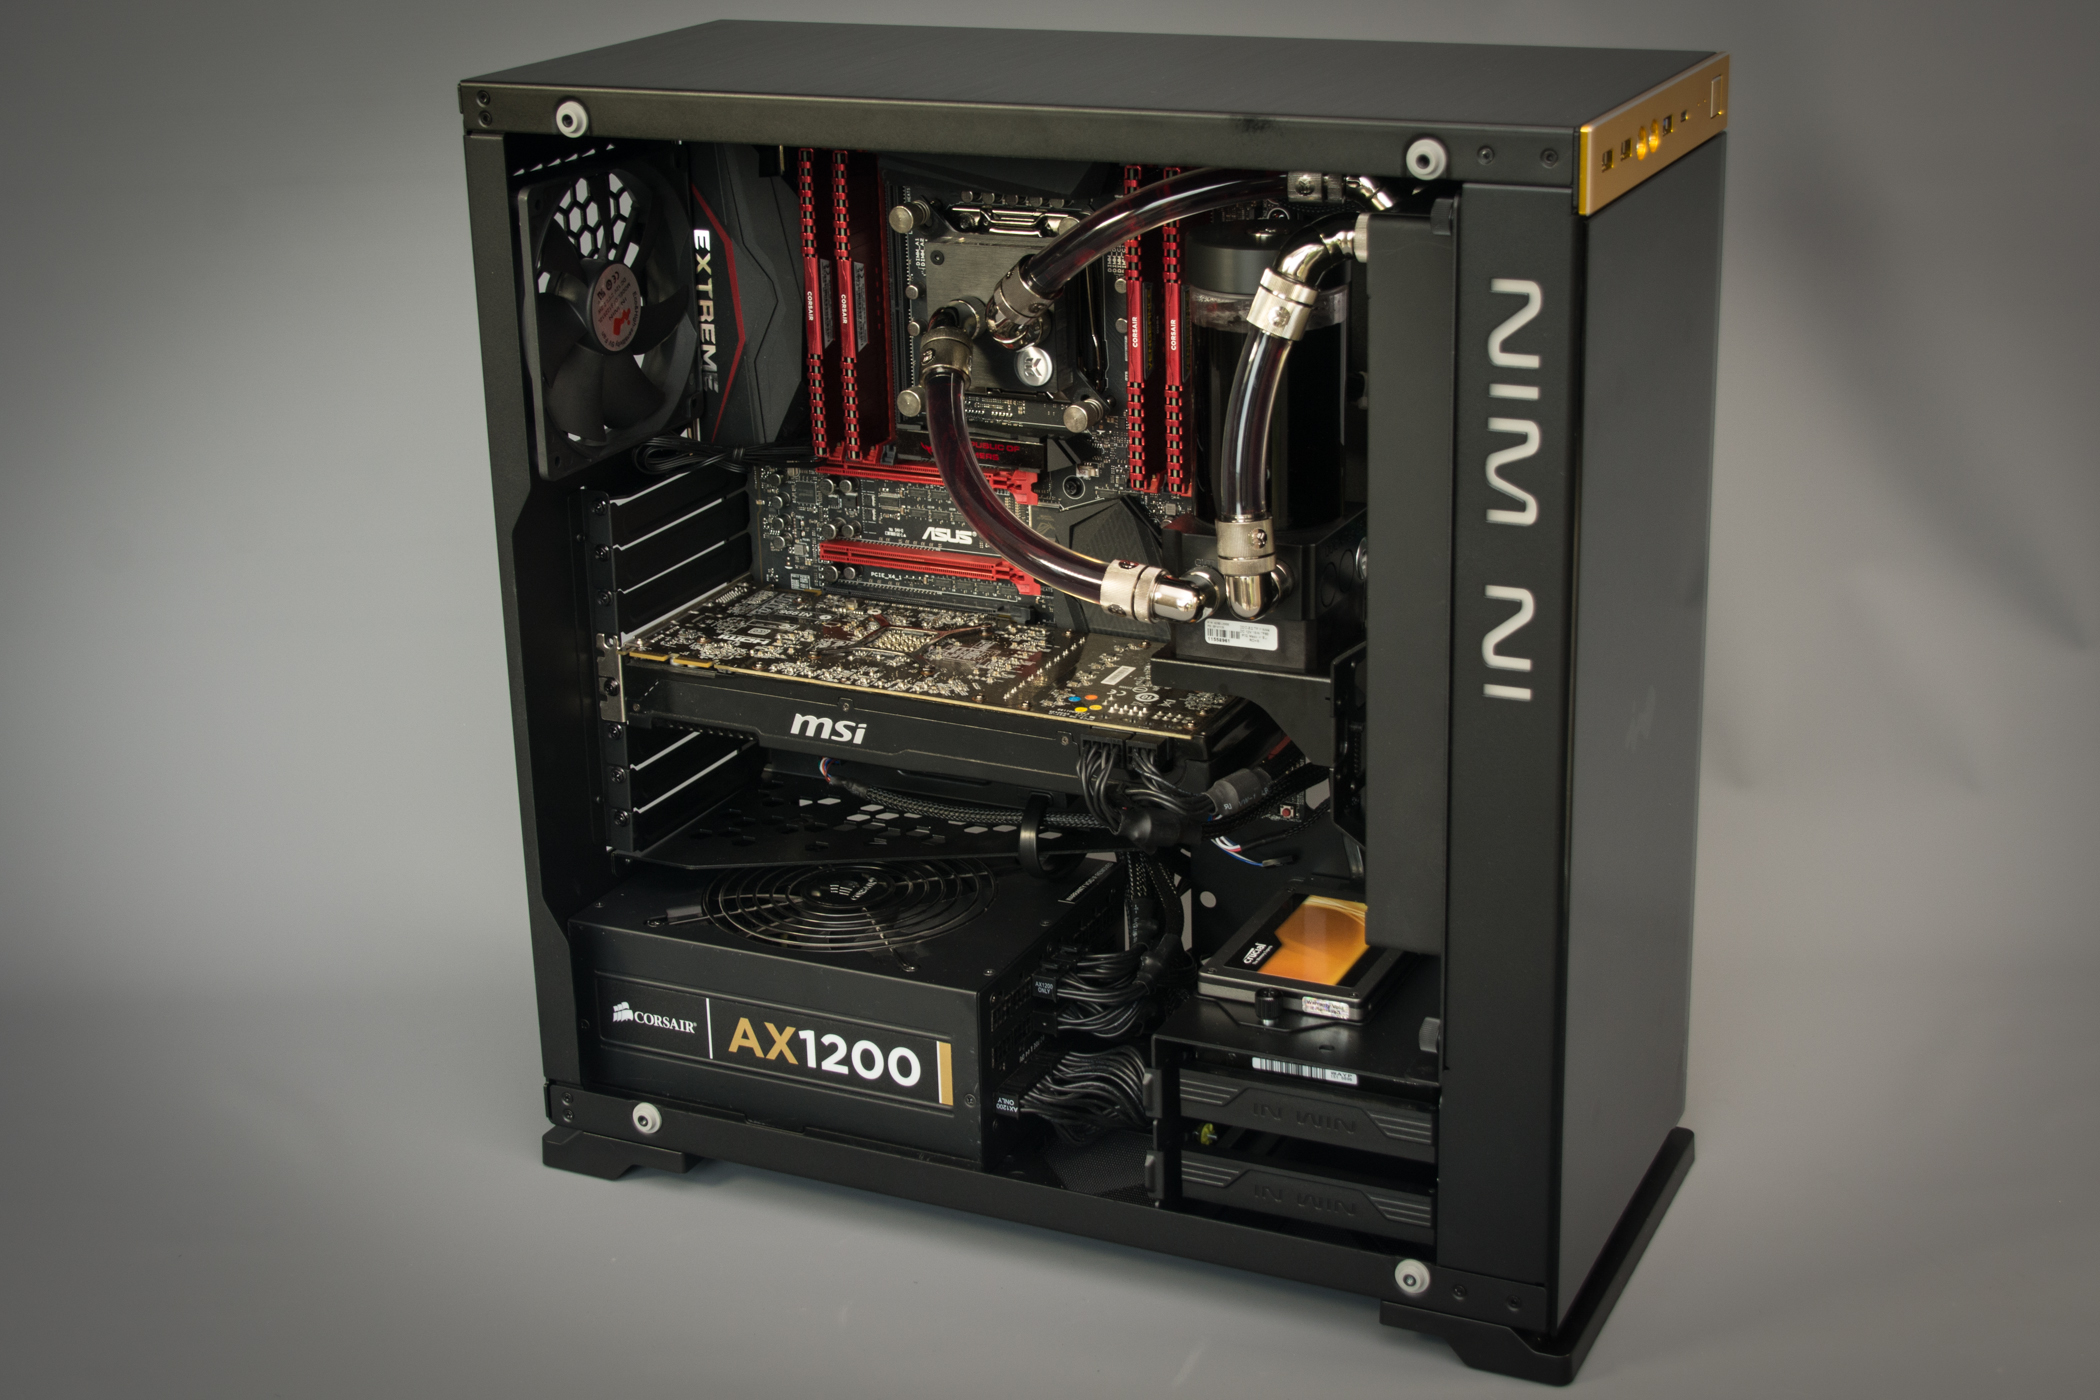



[…] In Win 805 Case Review […]
I’m having the same issues with this case, the air flow is absolutely shocking. I had to underclock my i5 4670k from 4.6Ghz down to 4.2Ghz to get acceptable temperatures. I don’t know why In Win didn’t bother putting any airflow under the PSU as all it does is exhaust into the GPU, causing it to run hot also. Also with the HDD bays, they could have designed the case with more clearance underneath the bays so that you could still run 2 fans of the bottom of the case, or atleast even 1 fan with the bays still in. If you want to run 2 fans on the bottom of the case then you must remove the HDD bays, which means you can’t mount any HDDs. I just don’t get it, why bother making a case look so amazing but then skipping out on the design performance wise. I’m thinking I will add ventilation under the PSU then drill holes so that it can be mounted the right way up. But creating ventilation to the front of the case will be hard as I’m not willing to mess around with the glass at all.
I have a 4670k @ 4.5 ghz running at 61c after 4 hrs. full load paired with gtx 770. These temps are more than acceptable. also the fan on the psu is exauhst not intake (not blowing anything on on your gpu. I use rear mounted push pull corsair h80i for cpu cooling and titanx reference cooler on gpu. Two 140mm fans mounted in front of case for circulation, no bottom intake fans. granted this is a low power rig, but the case is not as bad as you make out. If your worried about the cost of a few fans to add in, you should not have purchased a 200 dollar case.
PSU acts as a second rear exhaust fan, it extracts air out of the case! Corsair CPU water cooler H105 240 mm radiator/fan assembly mounted at front of case sucks air up from large filtered intake at bottom. EVGA water cooled GTX 980Ti Hybrid radiator/fan replaces rear top fan. This configuration keeps everything super cool …
You can put 4 rubber spacers 1/8 between the case and the glass front panel (front panel is held in with 4 screws). That way the front fans will suck in fresh air, its a small gap but a gap none the less. Without that small mod you really need to place atleast 1 fan in the bottom of the case. Also just mod a little so you can mount the bottom fans with the hdd case. Yes i agree its a shame but if you take the extra time you will have a case like no one else!.
PSU acts as a second rear exhaust fan, it extracts air out of the case! Corsair CPU water cooler H105 240 mm radiator/fan assembly mounted at front of case sucks air up from large filtered intake at bottom. EVGA water cooled GTX 980Ti Hybrid radiator/fan replaces rear top fan. This configuration keeps everything super cool …
Hey, this was a sweet review. I am wondering what parts you used for the cooling system? I am planning on copying your cooling setup. Let me know, thanks.
Awesome review! What are all of the parts you used for the cooling? I want to copy your cooling on my build with the In Win 805.
On the 805 I used an EK Supremacy MX cpu block, EK’s 3/8 x 5/8 compression fittings and their clear tube, an EK DDC 140 reservoir pump combo and an EK PE radiator. It’s very similar to this kit: https://www.ekwb.com/shop/ek-kit-l240-1 with the exception that I’m using a 140 res vs a 100 and I’m also using the universal mount to mount the pump to the radiator
If you are only doing a cpu loop then an AIO like the EK predator or Swiftech H220x might be a good choice also for the 805.
What did you do for setting up the loop on this build with the kit you used besides the small changes?
Last question, where did you get the universal mount for mounting the pump to the radiator?
Sweet, thanks for listing the parts and similar kits. Also thanks for the reply too.
Comments are closed.