


Now that we’ve had a detailed look of the board and all the accessories it’s time to take a look at performance, after all that’s why we’re here! Let’s start off with the basics of overclocking on X99 then. Back in the “good old” X58 days overclocking was more complicated, then the 2600K arrived and simplified everything massively. Suddenly all that mattered was a good chip, your vcore and your multiplier. Things are a bit more complicated with X99 but not dramatically so. A simple overclock would again mean turning up your core voltage and upping your multiplier – if you’re new there are even some predefined overclock profiles that essentially do that alongside a fairly safe and mild overclock. So with all this in mind let’s take a look at the bios. We’re only going to focus on the “advanced” version of the BIOS. It should be noted that in these screen shots I had been attempting some memory overclocks that caused only 3/4 DIMMs to post.
“Extreme Tweaker” is where you’ll spend most of your overclocking time in the BIOS:
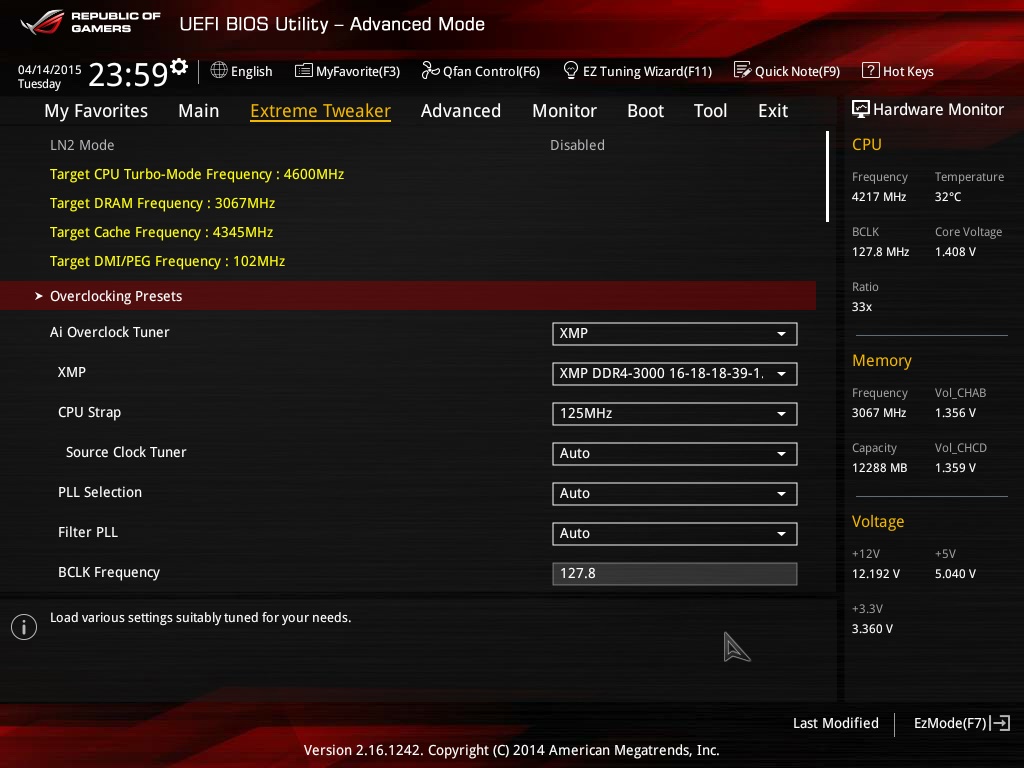
Here we can see a few things – I like to use the XMP profile for memory first as a baseline. When you select XMP on any “high” speed kit the bios also increases the cpu strap to 125 automatically. This is because in the early days this showed a lot more stability. You can also see the “target” frequencies are shown at the top. 4600MHz is about average for a 5820K or 5930K and this CPU was definitely average. A 5960X on the other hand averages about 100MHz less still. If you are new to overclocking there are some settings you can use here. The “Level Up” functionality lets you choose a preset frequency and the bios will mess around a bit and pop back up with that frequency. On our test system it didn’t screw with any voltages but simply chose the fastest XMP profile only this time it used the 100 strap and a 42 multiplier to give us the expected 4.2GHz. This seemed a little silly but is better than nothing if you are a beginner:
 The overclocking profiles instead gave us something more useful – by selecting the profile for a “gamer’s 6 core profile” – this then loaded a fully manual setup to give 4.5GHz for 1-3 cores and 4.3GHz for 4-6 cores. The uncore also got bumped to 3.0GHz. Voltages this time did get changed to a safe 1.35V for Vcore and 1.25V for the uncore. This however defaulted the memory to a lowly 2133MHz. Loading a DRAM OC profile instead then defaulted the CPU clocks back.
The automatic profiles then still have some work to do. Adding XMP on to the 4.5GHz profile and removing the rest seems like a cleaner simpler option.

Scrolling down the Exteme Tweaker page we get to the all important multiplier settings – as usual you can specify maximums per core. I prefer just finding syncing all cores as it simplifies stability testing and in the past I’ve rarely found that a single core gives me much better performance. For the benchers though they did add a cool feature to disable specific cores. For example if you had a 5960X with one weak clocking core you could disable it and have a much better clocked 7 core chip. You also get to tweak the CPU cache (or “uncore”) multiplier. This doesn’t affect things much apart from a few (mainly) synthetic benchmarks. We struggled to get this as high as the core frequency and even this required some extra voltage.
Next up are the voltages. X99 usually maxes out at ambient with about 1.35V. Because we are lazy and because temperatures are under control with water we set it to 1.4V so that we had margin and used static voltages rather than an offset where we could. The fully manual mode means the motherboard will take over control of the voltages from the CPU. The voltages can be set manually with either option.
A higher CPU In voltage means less current and with the Rampage V Extreme’s greater control of this voltage we can feel safer increasing it. The kind of voltages we are dealing with for 24/7 overclocks do not usually cause death themselves. In general there are a few death mechanisms for ICs:
DC voltage breakdown – either gate breakdown or drain to source breakdown of the transistor itself. Both of these are usually substantially higher than the voltages we use and is more of a risk for LN2 benching than for water/air overclocking.
High slew rate spikes – while users often worry about LLC causing voltage spikes on the CPU itself in reality these spikes are usually much less than would be seen even normally with LN2 and so are unlikely to actually cause death of the part due to the DC size of the spike. However the slew rate can cause more interesting effects as it can capacitively couple to more sensitive nodes. A better regulator therefore with appropriate LLC may help to avoid death.
Electromigration – electrons can “erode” metal/poly lines – higher voltages mean higher currents which means more electrons which means faster electromigration. Heat makes this exponentially worse. This is what you worry about if you are running an overclocked CPU at 100% load 24/7. This is a longterm effect. Designers will make metal/poly/vias for a certain amount of current for a certain “lifetime rating” at a particular temperature (the expected lifetime is usually not disclosed nor is the temperature). If you run more current and more temperature then this will reduce the life of the part from an unknown number of years to a lesser unknown amount.

Underneath the core voltage is the Cache or Uncore voltage followed by the system agent voltage. SVID support should be disabled when overclocking as it breaks the communication from the CPU to the external regulator allowing Asus to control it instead. The rest of the voltages have quite minor effects and therefore been left to Auto. It should be noted that Asus has a done a lot of work to optimize the auto setting of voltages. If you play around purely with frequencies of various components and leave the voltages to auto you’ll notice that a lot move as you might expect. This is by far the most calibrated and “smart” auto I’ve seen on any board.
The Digi + Power Control is where the detailed VRM settings are – here you can play with LLC, current limits and the efficiency/awesomeness of the VRMs. I tend to favor less efficient settings that generate more heat but mean that I don’t have to worry that I’m limiting my CPU’s performance instead. Note that extending current limits and other safety mechanisms means you’re also increasing risk of a CPU dying if something does go wrong.

Extreme Tweaker also houses the DRAM timings page – mostly you’ll only be playing with primary timings when overclocking memory:

There are pages and pages of settings that you can play around with and tweak in the bios just for memory alone. So much so in fact that DDR5 might be ready by the time you’re done. What the BIOS doesn’t do (or the manual) is particularly explaing the timings well. So here’s a basic primer for you:
– tCAS – the minimum number of clock cycles after the Column Address Stobe is sent out before the data is ready – both row and column address information should be provided to access the right data
-tRCD – the number of clock cycles after the Row Address is sent out before the Column Address can be sent out
-tRTP – the time for the read itself after the row has been selected and before the precharge
-tRP – time for Row Precharge – after accessing the a row a precharge is done, this is the number of clock cycles allowed for this before the next row can be accessed
-tRAS – the minimum time for Row Address Strobe – to locate a data bit both row and column address information should be provided
-tRef – the refresh period in clock cycles for idle memory bits (dynamic memory must be constantly refreshed or the stored charge will decay and data will be lost)
-tRFC – the number of cycles after a refresh before the memory cell can be accessed
-tRRD – the minumum time required between activation of different banks
Asus also have a bunch of tools built into the bios:
 The H-Key Configure lets you define a saved profie for the OC Panel to load when the “H” key is pressed. Secure Erase is quite useful, while saved bios profiles have saved me countless times. One of the most useful for debugging GPU issues though is a seperate GPU post:
 So overall the BIOS provides hundreds of tweakable settings to let you overclock in as much or as little detail as you’d like. But what about the two other methods?
Software
There is a huge amount of software you can install from Asus to go alongside the Rampage V Extreme, in fact I’d go as far as to say it’s unnecessary in just how many items there are. Just in the AI Suite package alone you have:
– AI Charger+
– Dual Intelligent Processors
– EZ Update
– Push Notice
– System Information
– USB 3.1 Boost
– USB BIOS FlashBack
– Wi-Fi Engine
Some of these are self explanatory, but you may assume you need them – for example Wi-Fi engine is not needed for wi-fi support – that is covered by the separate driver installation, the software simply adds the ability to setup the WiFi as an access point. There are also other optional tools like MemTweakIT!, CPU-Z, Asus HomeCloud, Asus Media Streamer,Wi-Fi GO!, GameFirst, KeyBot, PC Diagnostics Utility, RAMdisk, Asus Probe II, Asus AO Help, Asus Boot Setting, Disk Unlocker, ROG Connect, Asus WebStorage. This is all on top of the many drivers and firmware (and associated firmware update utilities) that you may also need.
This just seems crazy that there is so much software and it starts to feel like bloatware. Honestly if you overclock in the bios none of that is even necessary so it’s a good thing that necessary drivers are divorced from this unnecessary bloat.
So let’s ignore most of this and focus on the overclocking and fan profile software that is really made up of AI Suite, Asus Probe, MemTweakIt!
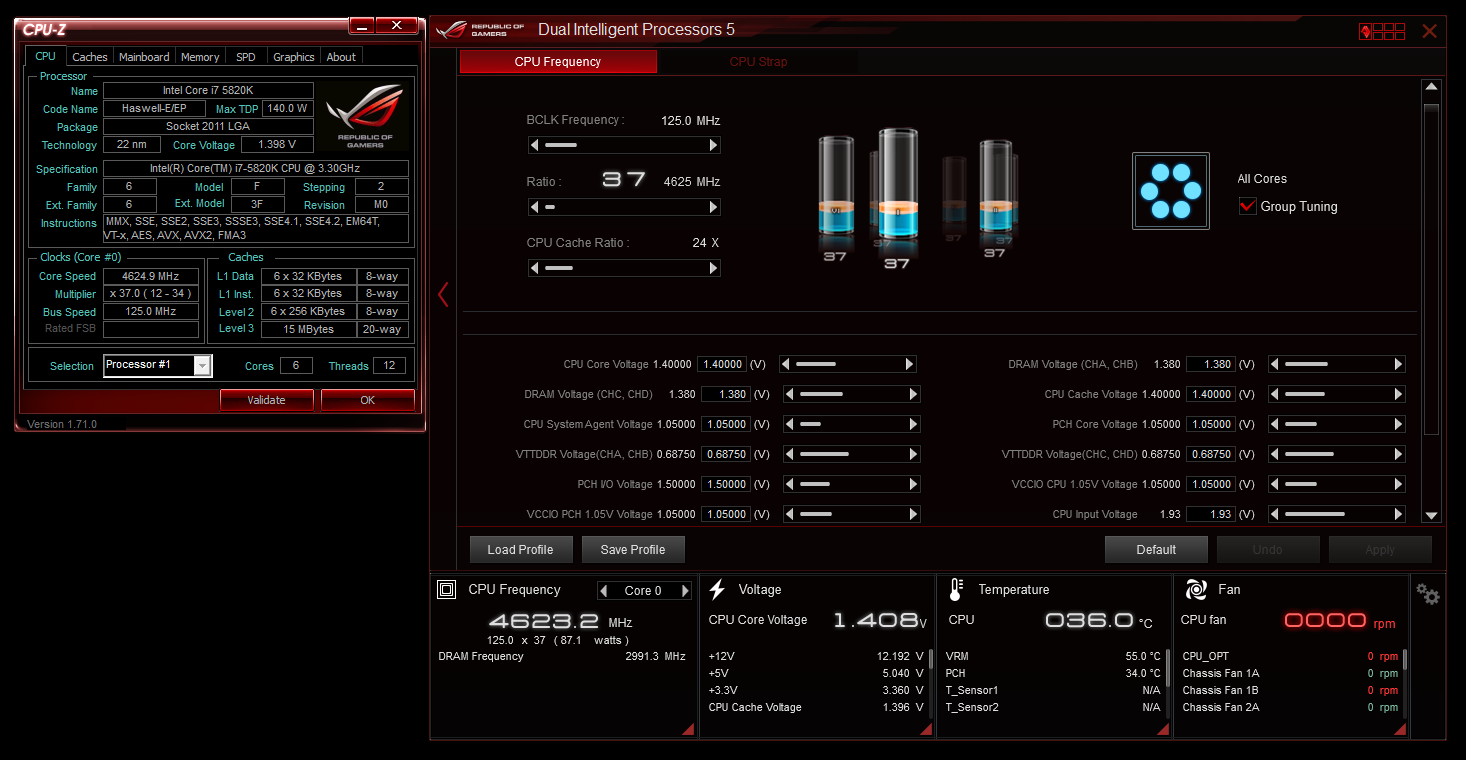
AI Suite is really not setup with overclocking in mind, and I suppose that’s ok. To access the overclocking section you have to click the TPU section of the front page, not for example the area with the CPU and DRAM frequency shown. But this is not the hardest part of AI Suite – the hardest is just getting it installed. After downloading the file Windows will not install it unless you go through the directories and right click every .exe (10+) and go to properties and unblock. Then you have to remember to run setup as administrator. It’s pretty annoying.
So now you’re ready to start overclocking – the main things you’ll be changing e.g. votlages bclk, cpu mult, cache mult are all accessible here. However changing the CPU strap requires a reboot, and memory tweaking has to be done in MemTweakIt which is a separate program:
 MemTweakIt is at least a focused program that’s less bloated and easier to figure out. However you can’t change the dram frequency, nor the CAS Latency. This is strange when you can tweak tons of secondary and tertiary timings, but not the most important things.
OC Panel
The OC Panel is cool, and it’s useful for almost anyone – for benchers it has a host of features, while for non benchers it can still be mounted in a drivebay and used to display some information instead:
 For benchers you can also remove the lower panel and expose switches, extra fan headers, LEDs and connectors for VGA hotwire connections.
This is all pretty cool. In normal mode it doesn’t do much except let you change between fan profiles and monitor a few things:
 E.G. CPU temp, CPU Fan Speed, BCLK and Multiplier. You can also use the OC button to apply the “Level Up” overclock profiles. But in Overclock mode acheived by hitting the top left button you then can start changing the following settings:

VCC IN, VCore, VDram, BClk, CPU Ratio, Cache Ratio and VGA Hotwire settings. There are two other mysterious icons that can be cycled through: H and P. H let’s you load the predefined “H” Hotkey setting in the BIOS. P let’s you define which of three modes are initiated when the pause is activated.
The screen in OC mode is again split in two where the top half is dedicated to two thermocouple probes that can plug in on the side of the unit:
 This is huge for a new bencher who may otherwise have to buy a digital thermometer instead purely for this. In fact this also can replace a multimeter though I suspect a real multimeter will be more accurate! So while we may complain that the motherboard doesn’t have bclk buttons or multiplier buttons they are no longer necessary when using this. Essentially the OC panel gives the budding overclocker everything they need to start benching apart from the cooling apparatus.
However not all is perfect.
 The cable is reluctant to bend and fit in the base. We understand that the cables have to go in the base in order to make it work with a drive bay but perhaps longer feet, or a 2nd cable with a right angled adapter would be better. This also goes for the last PCI slot. A GPU mounted in this slot may conflict with this cable (and many others). However during benching this is less of a problem as it’s unlikely a pot will be over the area in question.
Easy overclocks on X99 for water users:
First off we’re not going to go into RAM overclocking and tweaking. We’re assuming you bought memory that may not have that much headroom anyway. The first thing I would do when booting the system is to set the XMP profile this most likely will set the CPU strap to 125. Let’s first run a memtest on this with a stock CPU. If you’ve bought memory at 3000+MHz then you may fail memtest even with stock settings because the CPU can’t handle that speed itself. If so you may need to increase the DRAM voltage, or VCCSA, or simply turn down your memory speed. After memtest passes then enter the bios and scroll down the Extreme Tweaker page, set the voltage mode to Fully Manual, set your Vcore to 1.35V, set the DRAM voltage to the rated voltage on your DIMMs for the XMP profile in question. Give VCCSA a 100mV bump and bump VCCIN to 1.9V. Disable SVID. Sync the cores ratio for all cores. Turn up your multiplier until your target frequency is 4.4GHz or there abouts. Save and Exit and boot.
At this point we assume you boot into windows and can start stress testing the overclock. There are many ways to do this. Intel offers XTU which has a nice short and sweet memory and CPU test. Every stress test will stress the overclock in slightly different ways. I usually also run a SuperPI 32M and a Cinebench because again they are quick tests. If you crash then the overclock is unstable this can be resolved by turning the overclock down, or by increasing voltage (most likely vcore). If you are stable you can consider increasing the overclock. At first I would increase the cpu multiplier until you no longer stable. Once you find approximately the maximum overclock to the nearest multiplier you can then play with bclk to make smaller adjustments. Note however that bclk will also affect memory speed and cache speed too though. Once you’ve dialed in your overclock you can also increase the cache multiplier. I found it difficult to run the cache at the same speed as my core, but as always with overclocking your mileage may vary.
Once you’re pretty much dialed in I’d run a final check by running a prime95 blend overnight. If you’re stable then you can play around with the Cache multiplier and voltage as well as memory tweaking. If not then dial things back and try again.
So now let’s take a look at the performance!


The Ultra has not dissapeared, see Asus Z10 D8 WS + E5-2699v3, it’s called Workstation.
Agreed, I was referring to systems that could overclock While “real” workstation users will use that workstation board happily my “idea” of ultra enthusiasts consist of people who won’t give up their overclocked performance but still want more cores and are willing to pay for 2P. Those same workstation users who prefer more cores might even be happy with a 4P after all. Since the SR2 there have been no real overclockable 2P chips.
[…] Asus Republic of Gamers Rampage V Extreme X99 Motherboard Review for Overclockers! […]
Nice Review! Helped me a lot!
Can you tell me the name of the Waterblock in the top picture please? It looks so sick!
MIPS IceForce HF – MIPS closed down and I think AquaTuning bought all the remaining stock – so that might be your best for these if any remain!
Thank you very much!
[…] Asus Republic of Gamers Rampage V Extreme X99 Motherboard Review for Overclockers! […]
I think this board is too much oriented to the LN2 and TEC peoples. Of course we live under their umbrella so if ASUS covers those peoples, we are covered too. But sadly, most of us mortals won’t even use these hardware level (and few software level) features for WC builds, so don’t you think there should be lower-dog of ROG (probably R5 Formula) for X99? Or does Deluxe suffices?
I have to admit I’d rather see a Gene matx version before a formula. Yes for some the deluxe suffices for that role though
[…] Asus Republic of Gamers Rampage V Extreme X99 Motherboard Review for Overclockers! […]
Comments are closed.